


How to Configure an Asset Library in SharePoint


Using non-on brand or unlicensed imagery on your SharePoint sites can result in copyright and trademark violations – it can also drive your marketing team bananas!
Ditto with the proposals and presentations that get created in your organisation. I know our marketing manager gets totally ‘bent out of shape’ when folk don’t use our latest .docx and .potx templates.
In this article we’re going to look at how you can stay on-brand using Organisation Asset Libraries and something called a Content Delivery Network….
Asset libraries have to be manually created and this article provides a step-by-step ‘how to’ guide.
What are Organisational Asset Libraries and CDNs?
When dealing with files and images that everyone uses enterprise wide, it makes sense to make these as quick and efficient to access as possible using a Content Delivery Network (CDN).
A CDN is an industry-wide concept (not just a Microsoft one) where a series of servers spread out in various locations are used to host content like images and videos. The idea being that content is ‘pulled from’ the nearest server, reducing the time it takes to access items.
Microsoft offers a built-in Microsoft 365 CDN which is included with your SharePoint Online subscription and which can be used to create two asset library types:
- one for storing images such as branding, licenced imagery, etc,
- one for storing Office templates such as Word, PowerPoint & Excel templates.
More on how to set these up lower down in this article.
There are also two types of CDN, Public and Private. Normally you would use a Private CDN, to only allow your enterprise users access. Just to confirm, it is a private CDN we will be setting up in this article.
See this article for more information on CDNs.
Now let’s get into it...
Planning
First off – be sure to involve your marketing team and get them to start curating licenced, on-brand imagery, icons and logos. The same applies for your template Word docs and PowerPoints.
Once this service is set up they will be able to start populating the relevant assets into the relevant places.
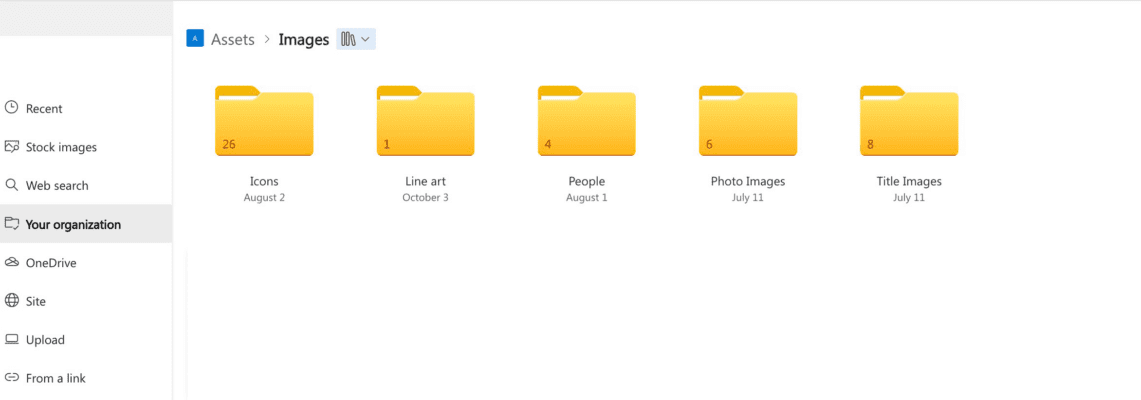
The example below shows an images assets library with subfolders for organising different image types.
Setting it Up
Check You Have Appropriate Privileges (or Know Someone that Has)
You’ll need to be a SharePoint Administrator and also be your local PC administrator. You’ll also need to allow PNP PowerShell on your tenant which needs Global Administrator rights.
If you don’t have these rights – find a colleague in the IT department that does and signpost this article!
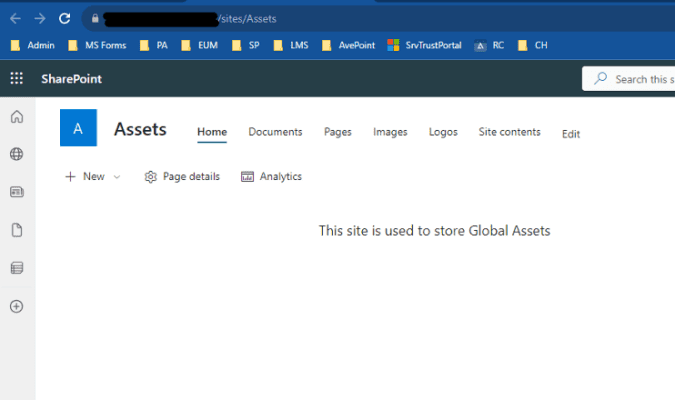
Create the Asset Library SharePoint Site
The Asset libraries can be stored under a specific SharePoint Online site which is used to host the libraries. This allows other sites to be renamed/moved without affecting the location of the assets. It also helps keep track of access rights.
As a SharePoint Admin, create a SharePoint Communication site.
Optionally change the front page to tell anyone that browses to the site what its purpose is.
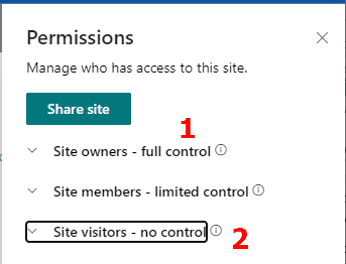
Set the Site permissions.
- Users that can change assets go in the Owners group
- Everyone except external users go into the Visitors group.
Install PowerShell 7.3
At time of writing, you need version 7.2 or later, though its best to use 7.3 if possible.
To check which version of PowerShell you currently have installed on your PC just open up PowerShell and type $PSVersionTable.
See this article for installing 7.3 if needed.
Install PnP
If you haven’t got PnP installed on your PC, first check the old legacy version is not already installed.
Get-Module SharePointPnPPowerShellOnline -ListAvailable | Select-Object Name,VersionIf this command comes back with an old version then use this line to remove it:
Uninstall-Module SharePointPnPPowerShellOnline -Force -AllVersionsInstall the latest version using this command:
Install-Module PnP.PowerShellSee this article for more detail on installing PnP.
Register PNP
If you have access to a Global Admin account, register PNP to allow it access to your Tenant by running the command:
Register-PnPManagementShellAccess
It will come up with a list of rights that need to be approved as per a normal Azure App registration.
If you need further information or need to pass on the Content confirmation to a Global Admin account refer them to to this article.
Connect to your Azure Tenant
Using PowerShell, connect to your Tenant….
Connect-PnPOnline -url https://YourTenant-admin.sharepoint.com -InteractiveCreate CDNs if Needed
Check with your Azure team if CDNs have been already been created for your Tenant. If not, use these commands:
See if the Private CDN has been enabled:
Get-PnPTenantCdnEnabled -CdnType PrivateThen if needed, enable the private CDN using this command:
Set-PnPTenantCdnEnabled -CdnType Private -Enable $trueCreate Site Libraries
Once you have set up the environment, you can now create your Asset Libraries.
You can create two types of organisational asset libraries:
- One for storing your company-standard imagery (ImageDocumentLibrary) and
- Another to store your Office document templates (OfficeTemplateLibrary).
This example setups an image asset library called logos, which is private to the Tenant.
Add-PnPOrgAssetsLibrary "https://YourTenant.sharepoint.com/sites/assets/logos" -CdnType Private -OrgAssetType "ImageDocumentLibrary"It’s possible to add an icon (or thumbnail) to represent each image library if desired.
Note that your images can be organised into subfolders, however your Office templates all need to sit in an Office Template Library at the ‘top level’.
Test & Launch Your CDN
It can take a while (anything from 1 hour to 24 hours) for the above actions to complete, but you can then give your marketing team access to this Assets site and get them uploading imagery, creating folders or adding metadata as required to the Images libraries, and templates to the Office Templates Library.
Once ready, anyone that’s responsible for maintaining SharePoint content will have access to option to a location called ‘Your Organization‘ from which to obtain corporate images.
Finally, launch this service to all your SharePoint contributors, and ensure Office users have at least read permissions on the root site for your organisation in order for the templates in your organisation assets library to appear in their Office apps.
You will of course need to communicate the availability of these new services to all concerned in your organisation.
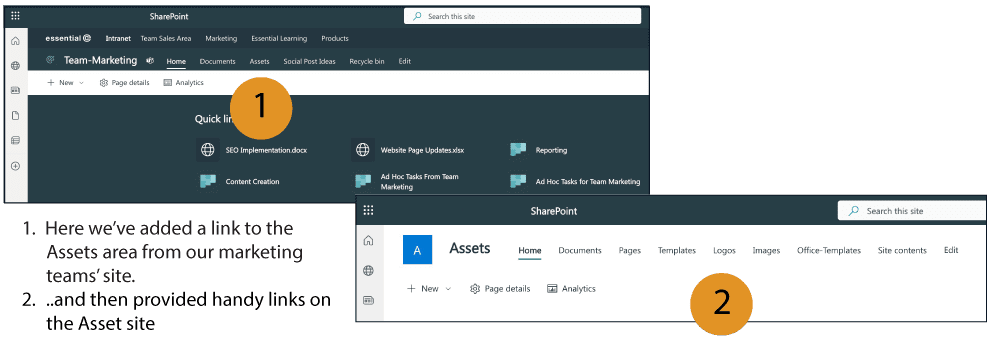
OUR TIPS – Make sure your marketing team keeps the repository updated. To this end, it makes sense to set up a handy link to the Assets site from, say, their marketing Team site.
This is an example from our ‘Marketing’ site.
How Users Access Standard Images & Templates from Your CDN
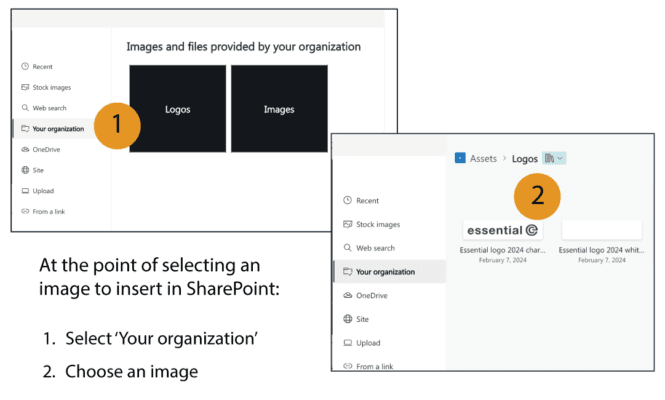
Adding Images into SharePoint
When SharePoint admins go to add an image, they will now be able to navigate to your ‘company standard’ imagery via the ‘Your organization’ option.
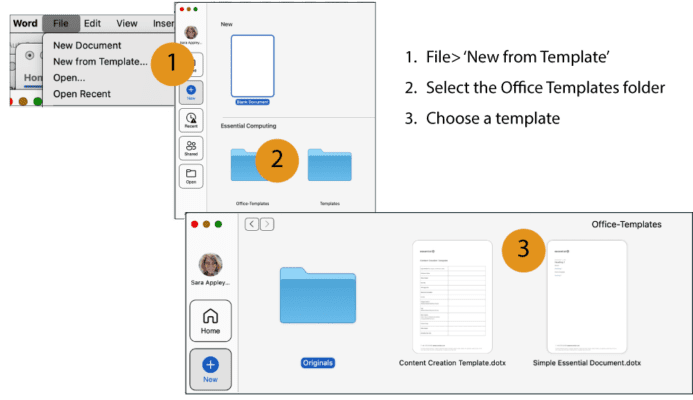
Selecting Document Templates
When a user creates a new Word document or a new PowerPoint*, they can now select ‘new from template’ and navigate to your organisation’s Office Templates folder to see the available templates. The following Office apps are supported: Word, Excel, or PowerPoint desktop apps. Microsoft 365 Apps Version 2002 or later is also required.
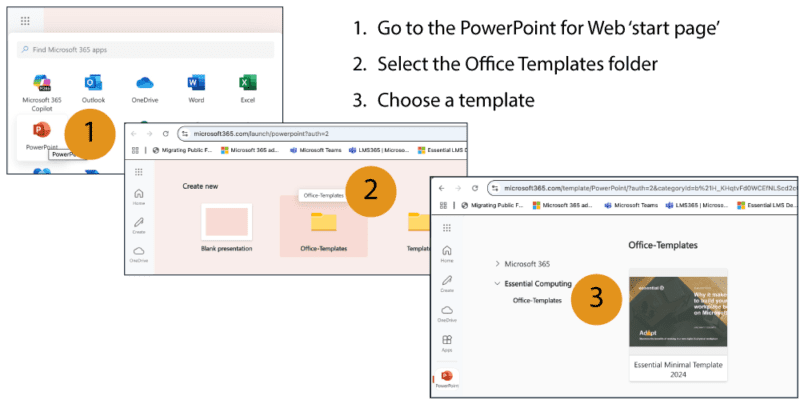
*If working with PowerPoint for web, users need to take a different approach to accessing templates. Instead, users must go to the PowerPoint start page (for example, by clicking on the PowerPoint app) and the selecting Office Template Library. Also note that to see the organisation assets library in PowerPoint on the web, they must have an Office 365 E3 or E5 license assigned.
We hope you find this useful – and that it helps keep your company ‘on brand’.
Find out more about our SharePoint Services
We offer a range of services to help you get the most out of your SharePoint Online environment, including storage management, secure access for external users. and design services.