


SharePoint Management
How to Configure DIY SharePoint Online Archiving


Introduction
SharePoint Online (aka SPO) offers an impressive storage capacity: Each tenant is initially allocated 1TB of storage plus an additional 10GB per licensed user, but is it enough?
In our experience, if your organisation works with large files (such as media, entertainment, healthcare, and construction) you may already be finding it hard to keep within default SharePoint quotas.
For SharePoint Online, the excess storage cost is currently set at $0.20 per gigabyte per month. This means that for every gigabyte of storage space you exceed beyond your allocated quota, you will be billed an extra $0.20 per month.
It soon mounts up. One of our clients is currently facing a SharePoint overage charge of $2million a month (£1,640,00) a month.
Archiving is one way to reduce the amount of data stored in SharePoint Online.
In this article we want to look at what would be involved in setting up your own SharePoint Online archiving service!
How does SharePoint Online Archiving Work?
The concept of providing an archiving service for SharePoint Online involves moving selected files to an alternative cost-effective storage option.
This could be Azure Blob storage, but equally it could be to Amazon AWS, a local NAS server, or even individual OneDrive accounts. Note that the latter is more limited as it not suited to shared access and could contravene your Microsoft Services Agreement.
As part of the archiving process, the original files are replaced with much smaller shortcuts (hyperlinks). These links lead directly to the archived files and, simply by clicking on them, the original file is retrieved.
Given that the original file is deleted from SharePoint Online, and the size of the replacement shortcut file is very small, typically only a few kilobytes (KB) or even less, this leads to considerable savings.
So that’s the general idea – sounds straightforward right?
Let’s look into what’s involved in setting up your own DIY archiving service for SharePoint Online using Azure Blob storage.
How to set up Your Own SharePoint Online Archiving to Azure Blob Storage
Here are some general steps to follow when setting up a DIY archiving solution to automatically keep your SharePoint document libraries/lists ‘trimmed down’.
- Determine the archiving criteria: Before you start, determine what content should be archived and based on what criteria (e.g., age, inactivity, compliance requirements).
- Create your PowerShell script: Use the SharePoint Online Management Shell and SharePoint APIs to write a script that retrieves the content to be archived based on your criteria and moves it to an archive location. The script should also create a shortcut to the archived item and store it in the shortcut library.
- Schedule the script: Schedule the script to run at regular intervals (e.g., daily, weekly, monthly) using Windows Task Scheduler or another scheduling tool.
- Notify users: Notify users of the archiving process and provide them with instructions on how to retrieve the archived items using the shortcuts in the shortcut library.
Example SharePoint Archiving PowerShell Script
Below is an example PowerShell script* that uses the SharePoint Online Management Shell and Azure PowerShell modules to archive items that have not been accessed for 2 years:
For each item in the created SharePoint Online list, it performs the following actions:
- Retrieves the filename and saves the file to the specified temporary folder on the local disk.
- Constructs the URL for the file in SharePoint and the blob storage URI for Azure Blob Storage.
- Uploads the file from the temporary folder to the Azure Blob Storage container.
- Creates a shortcut URL file in SharePoint to replace the original file, using the blob storage URI.
- Deletes the original file in SharePoint.
- Removes the temporary file from the local disk.
# Install required modules
Install-Module -Name PnP.PowerShell
Install-Module -Name Az.Storage

# Set variables for Azure Blob Storage
$storageAccountName = "<storage_account_name>"
$containerName = "<container_name>"
$connectionString = "DefaultEndpointsProtocol=https;AccountName=<storage_account_name>;AccountKey=<account_key>;EndpointSuffix=core.windows.net"
$ctx = New-AzStorageContext -ConnectionString $connectionString

# Specify temporary folder on the local disk to store files
$tempPath = "C:\temp\SPArchive\"

# Set variables for SharePoint access
$siteUrl = "https://<sharepoint_domain>/sites/<site_name>"
$username = "<username>"
$password = "<password>"
$encpassword = ConvertTo-SecureString -String $password -AsPlainText -Force
$cred = New-Object -TypeName System.Management.Automation.PSCredential -ArgumentList $username, $encpassword
$listName = "Documents"

# Connect to SharePoint
Connect-PnPOnline -Url $siteUrl -Credentials $cred
$web = Get-PnPWeb

# Get a list of files older than 2 years
$items = Get-PnPListItem -List $listName -PageSize 1000 | Where-Object { $_.FieldValues.Modified -lt (Get-Date). AddDays(-730)}

# Process each file
foreach ($item in $items) {
    # Ignore shortcut URL files in SharePoint
    if ($item.FieldValues.File_x0020_Type -ne "url") {
        $filename = $item.FieldValues.FileLeafRef
        Write-Host "filename = $($filename)"

        # Save file to the temporary disk folder
        Get-PnPFile -Url $item.FieldValues.FileRef -AsFile -Path $tempPath -Filename $filename
        $fileUrl = "https://<sharepoint_domain>" + $item.FieldValues.FileRef
        Write-Host "fileUrl = $($fileUrl)"

$blobUri = "https://$storageAccountName.blob.core.windows.net/$containerName/$filename"

        $filePath = $tempPath + $filename
        Write-Host "filePath = $($filePath)"

        # Send the file from the temporary folder to the blob storage
        $blob = Set-AzStorageBlobContent -Blob $filename -Container $containerName -File $filePath -Context $ctx -Force -BlobType Block -StandardBlobTier Cool

# Create a shortcut URL file in SharePoint to replace the original file
        $shortcutContent = "[InternetShortcut]`r`nURL=$($blobUri)"
        $shortcutFilename = $filename + ".url"
        Write-Host "shortcutFilename = $($shortcutFilename)"
        Write-Host "shortcutContent = $($shortcutContent)"
        Add-PnPFile -FileName $shortcutFilename -Folder $item.FieldValues.FileDirRef -Content $shortcutContent

        # Delete the original file in SharePoint
        Remove-PnPFile -ServerRelativeUrl $item.FieldValues.FileRef -Force

# Delete the temporary file from the disk
        Remove-Item $filePath

    }
}
In the above code, you need to replace the following placeholders with appropriate values:
- <storage_account_name>: Replace with the name of your Azure Blob Storage account.
- <container_name>: Replace with the name of your Blob Storage container.
- <account_key>: Replace with the account key for your Azure Blob Storage account.
- <sharepoint_domain>: Replace with the domain name of your SharePoint site.
- <site_name>: Replace with the name of your SharePoint site.
- <username>: Replace with your SharePoint username.
- <password>: Replace with your SharePoint password.
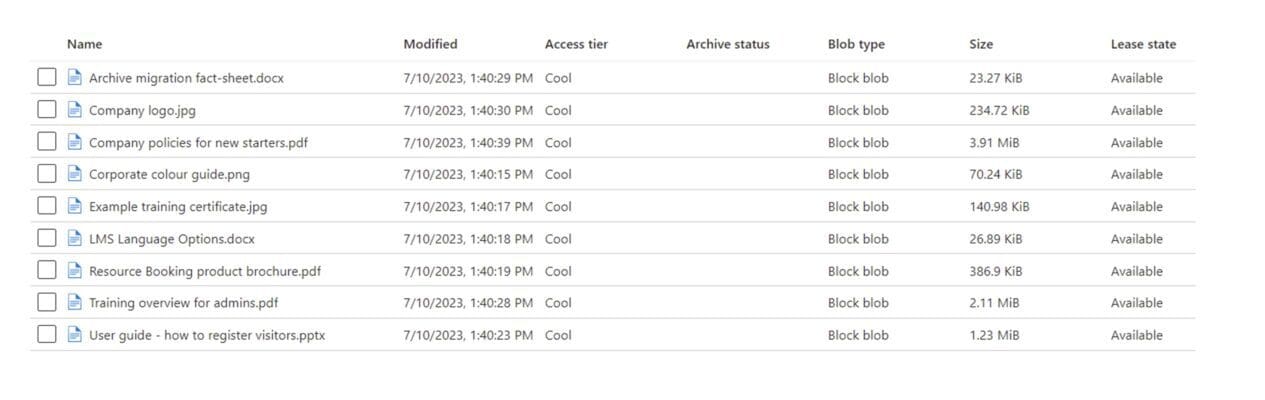
After the script has run, the original files can be seen in Azure:
….and the shortcuts to these files are now in SharePoint Online.
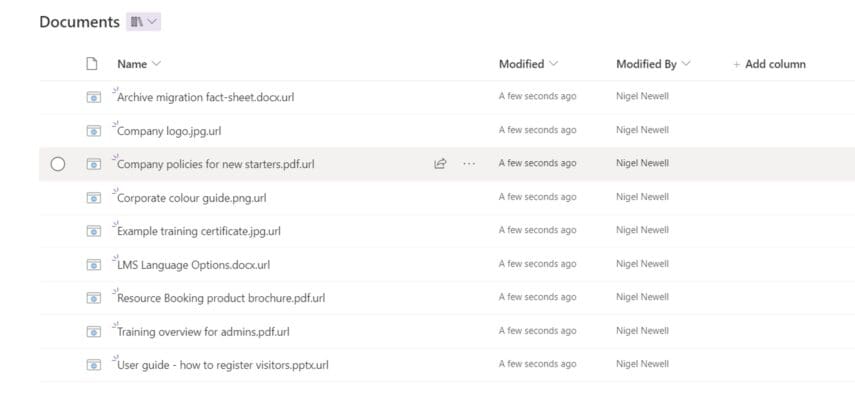
Users can simply click on these URLs to retrieve the corresponding file from Azure Blob Storage.
*This example PowerShell script is intended to show you how easy it is to set up SharePoint archiving. If you plan to implement such a service, this script should be fully tested assessed for suitability. Essential is not responsible for any errors or omissions, or for the results obtained from the use of this information.
Some Observations
This is just a starting point to show the ‘art of the possible’ when it comes to SharePoint Online archiving and saving storage costs.
Our DIY example has little in the way of error checking and, as you may observe, it is done via a temporary store, and not in memory. This is because archiving files from SharePoint to Azure Blob Storage directly without using temporary disk space is not possible with the current set of available cmdlets and modules from Microsoft.
The algorithms for selecting what you wish to archive may also vary depending on site, file type, size, age, etc. If you want to select items according to the last accessed date (e.g. files that haven’t been accessed for the last x years), this will be trickier and may require checking through SharePoint Online Audit Logs.
You might also want to direct your files to different Azure storage tiers or different storage locations depending on different criteria. Bear in mind whatever your Azure storage tier choice is here will impact the cost of storage and speed of recovery for end users.
For example, retrieving from the Azure Archive storage tier will be slower, but cheaper.
Also going forwards you may want to migrate items between storage tiers. For example, migrating items older than 3 years from Cool to Archive, or delete items older than 7 years altogether.
Bear in mind that file properties will also change when you move them to Azure, for example, modified dates will reset, and this may impact your ongoing data management.
Another important consideration is the user experience when you retrieve a file that’s been archived.
Our example script replaces the original file with a shortcut, and when you click on it the original file will be downloaded locally to the user’s desktop.
This modus operandi means that users will need to re-upload any changes they make to the file to SharePoint.
Also, when an item is archived, the search in SharePoint Online only has the metadata in the shortcut to ‘go on’.
What Benefits Would a Third-Party SharePoint Archiving Tool offer?
By now, you may have realised that opting for a do-it-yourself (DIY) approach to SharePoint archiving may prove more challenging than anticipated.
Fortunately, there are third-party tools available that can greatly simplify the entire process of archiving content in SharePoint Online.
In addition to more sophisticated archiving policies and automation, they offer:
- Advanced search capabilities to support eDiscovery.
- Sophisticated retention management policies in Azure, such as automatically transitioning content between tiers.
- Failover services.
- An enhanced end user experience (e.g., avoiding the need to re-upload any amended files that have been retrieved).
Will Microsoft Syntex offer SharePoint Archiving?
During the October 2022 Microsoft Ignite event, Microsoft made an announcement regarding the upcoming introduction of Syntex archiving for SharePoint and Microsoft Teams.
This new feature will leverage AI to help you understand your data better.
In the context of SharePoint archiving, Syntex will allow you to use AI-based content analysis – rather than reliance on fixed attributes – to determine what should be archived, where and for how long.
Third-party vendors are already seeking to leverage this capability as part of their archiving and backup solutions.
It’s also worth noting that the pay-as-you-go licencing cost of Syntex may be prohibitive depending on the amount of data you need to to ‘process’.
This means third-party archiving solutions will still represent a cost-effective and practical solution to tackling SharePoint Online overage for many enterprises.
SharePoint Online Archiving – Discover Your Options
As an impartial vendor, Essential can provide enterprises a comprehensive comparison of these solutions, highlighting their unique features and pricing.