


Microsoft Places
How to configure Microsoft Bookings to Book Car Parking Spaces


Microsoft Bookings is a user-friendly tool that lets people – inside or outside your organisation – easily find and book available meeting times or services offered by you or your team.
While its primary focus is on booking people’s time and services, ‘at a push’ you can use it to book parking spaces and other resources.
This article takes you through how to configure a car park space booking system using Microsoft Bookings.
You can then use this parking booking service alongside Microsoft Places* or on your company intranet.
*Last time we checked, booking parking spaces wasn’t on the Places roadmap.
TL;DR?
Whilst you can use Microsoft Bookings to set up a parking reservation system, it’s not perfect.
It’s fine for simple car park booking needs, but if you want more control – like rules, usage limits, multi-bay logic, our dedicated resource booking tool takes you further.
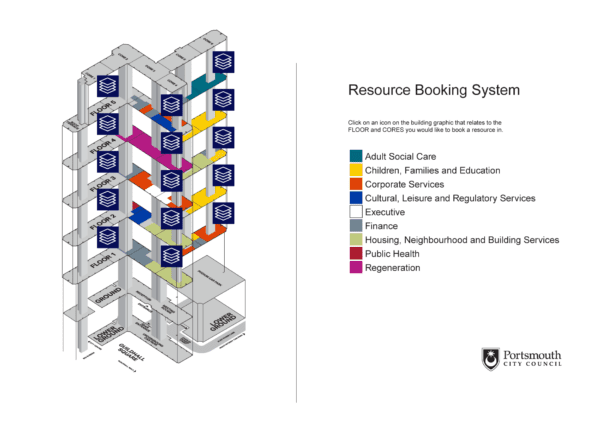
Bookings not quite the ticket? Discover other resource booking options
Resource Booking systems for Microsoft 365
These are the steps to configure Microsoft Bookings as a car parking space booking system
How to configure Microsoft Bookings to allow car park booking
Below are the steps to build a service that provides a set number of bookable parking spaces in your office car park. Note that I will refer to the ‘customer’ of the service as the ‘Bookee’ and the ‘staff’ that will be assigned oversee any bookings as the ‘Admins’.
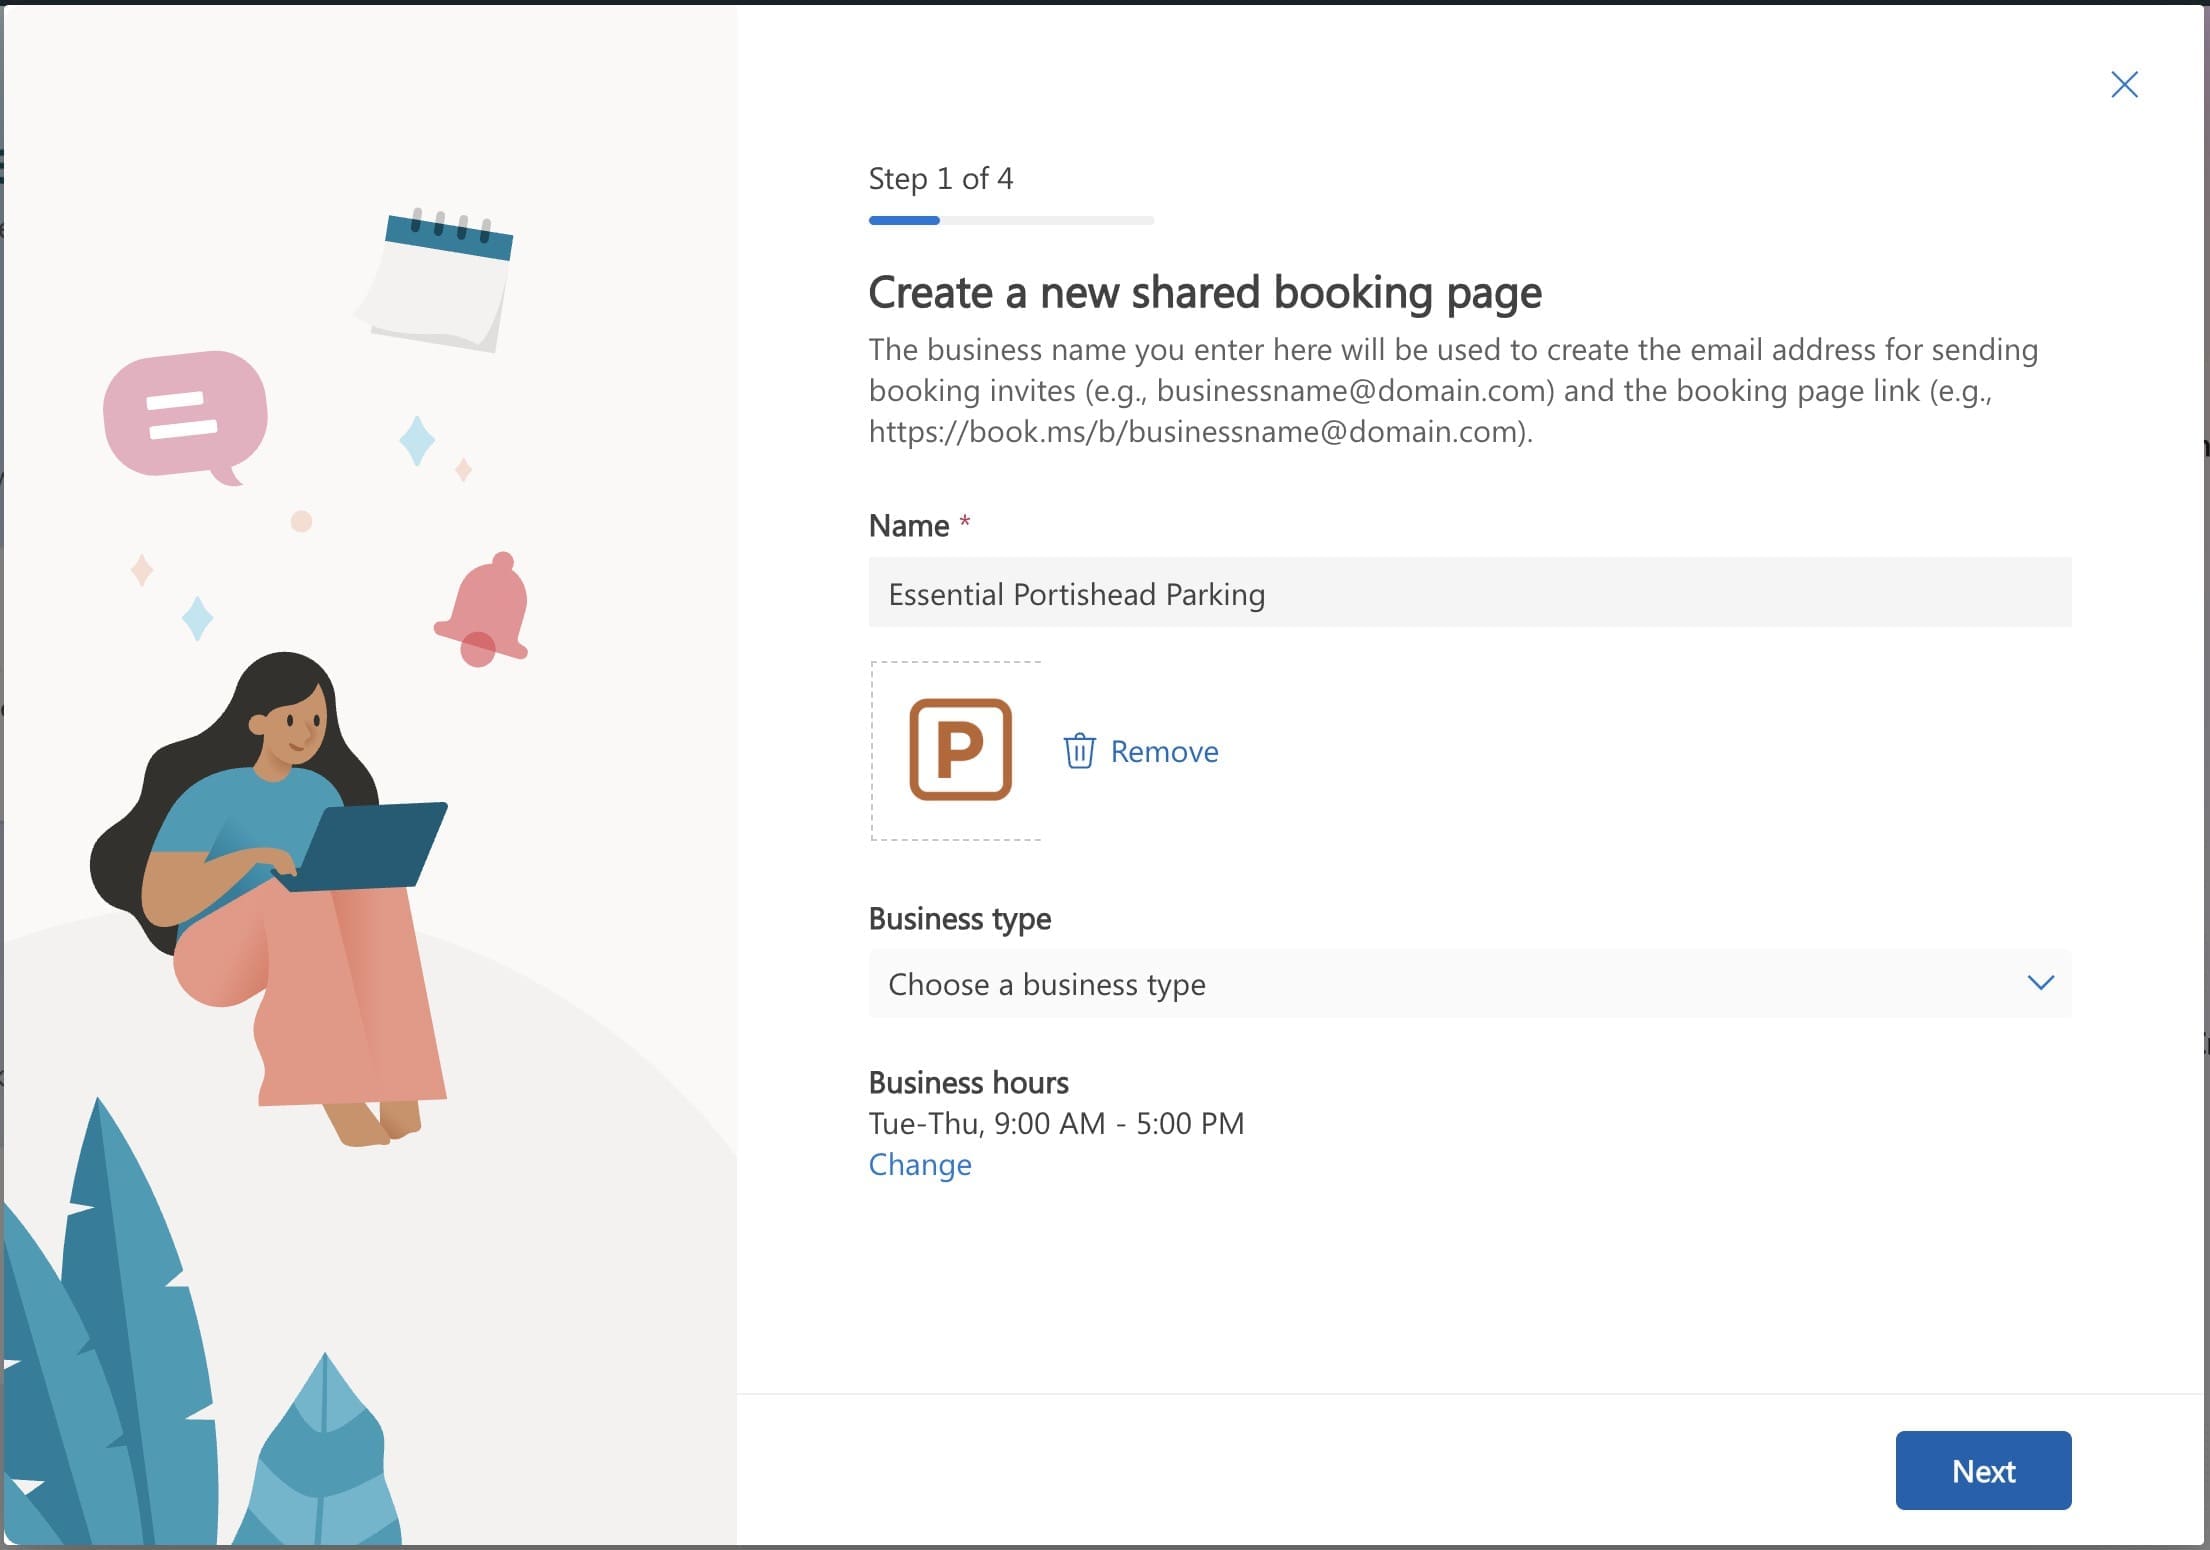
1. Create a Shared Microsoft Bookings Page
The first thing you need to do is set up a shared bookings page which effectively will be the container for one or more specific services – e.g. ‘Visitor Parking,’ ‘Staff Parking,’ or ‘EV Charging Bay.’
Without this container, you have nowhere to publish or manage those services from.
This next section walks you through the steps, but don’t pay too much attention to what you configure at this stage, as we will create your actual parking service options later.
Open Bookings: Open the following link in your browser: https://outlook.office.com/bookings/
Create Your Services Page:
Click “Create” to add a new Shared booking page
Specify a name for the booking page, e.g., ‘Parking’.
Select a logo file for your page, I chose the classic ‘P’ sign.
If you know the hours during which your parking service will be available, you can configure them here.
Note that you’ll be able to configure specific hours for each service later.
Add ‘staff’ members:
On the next page, you’ll be prompted to invite staff members that will be associated with the service – aka the service Admins. I just added myself for now – more about how this works later.
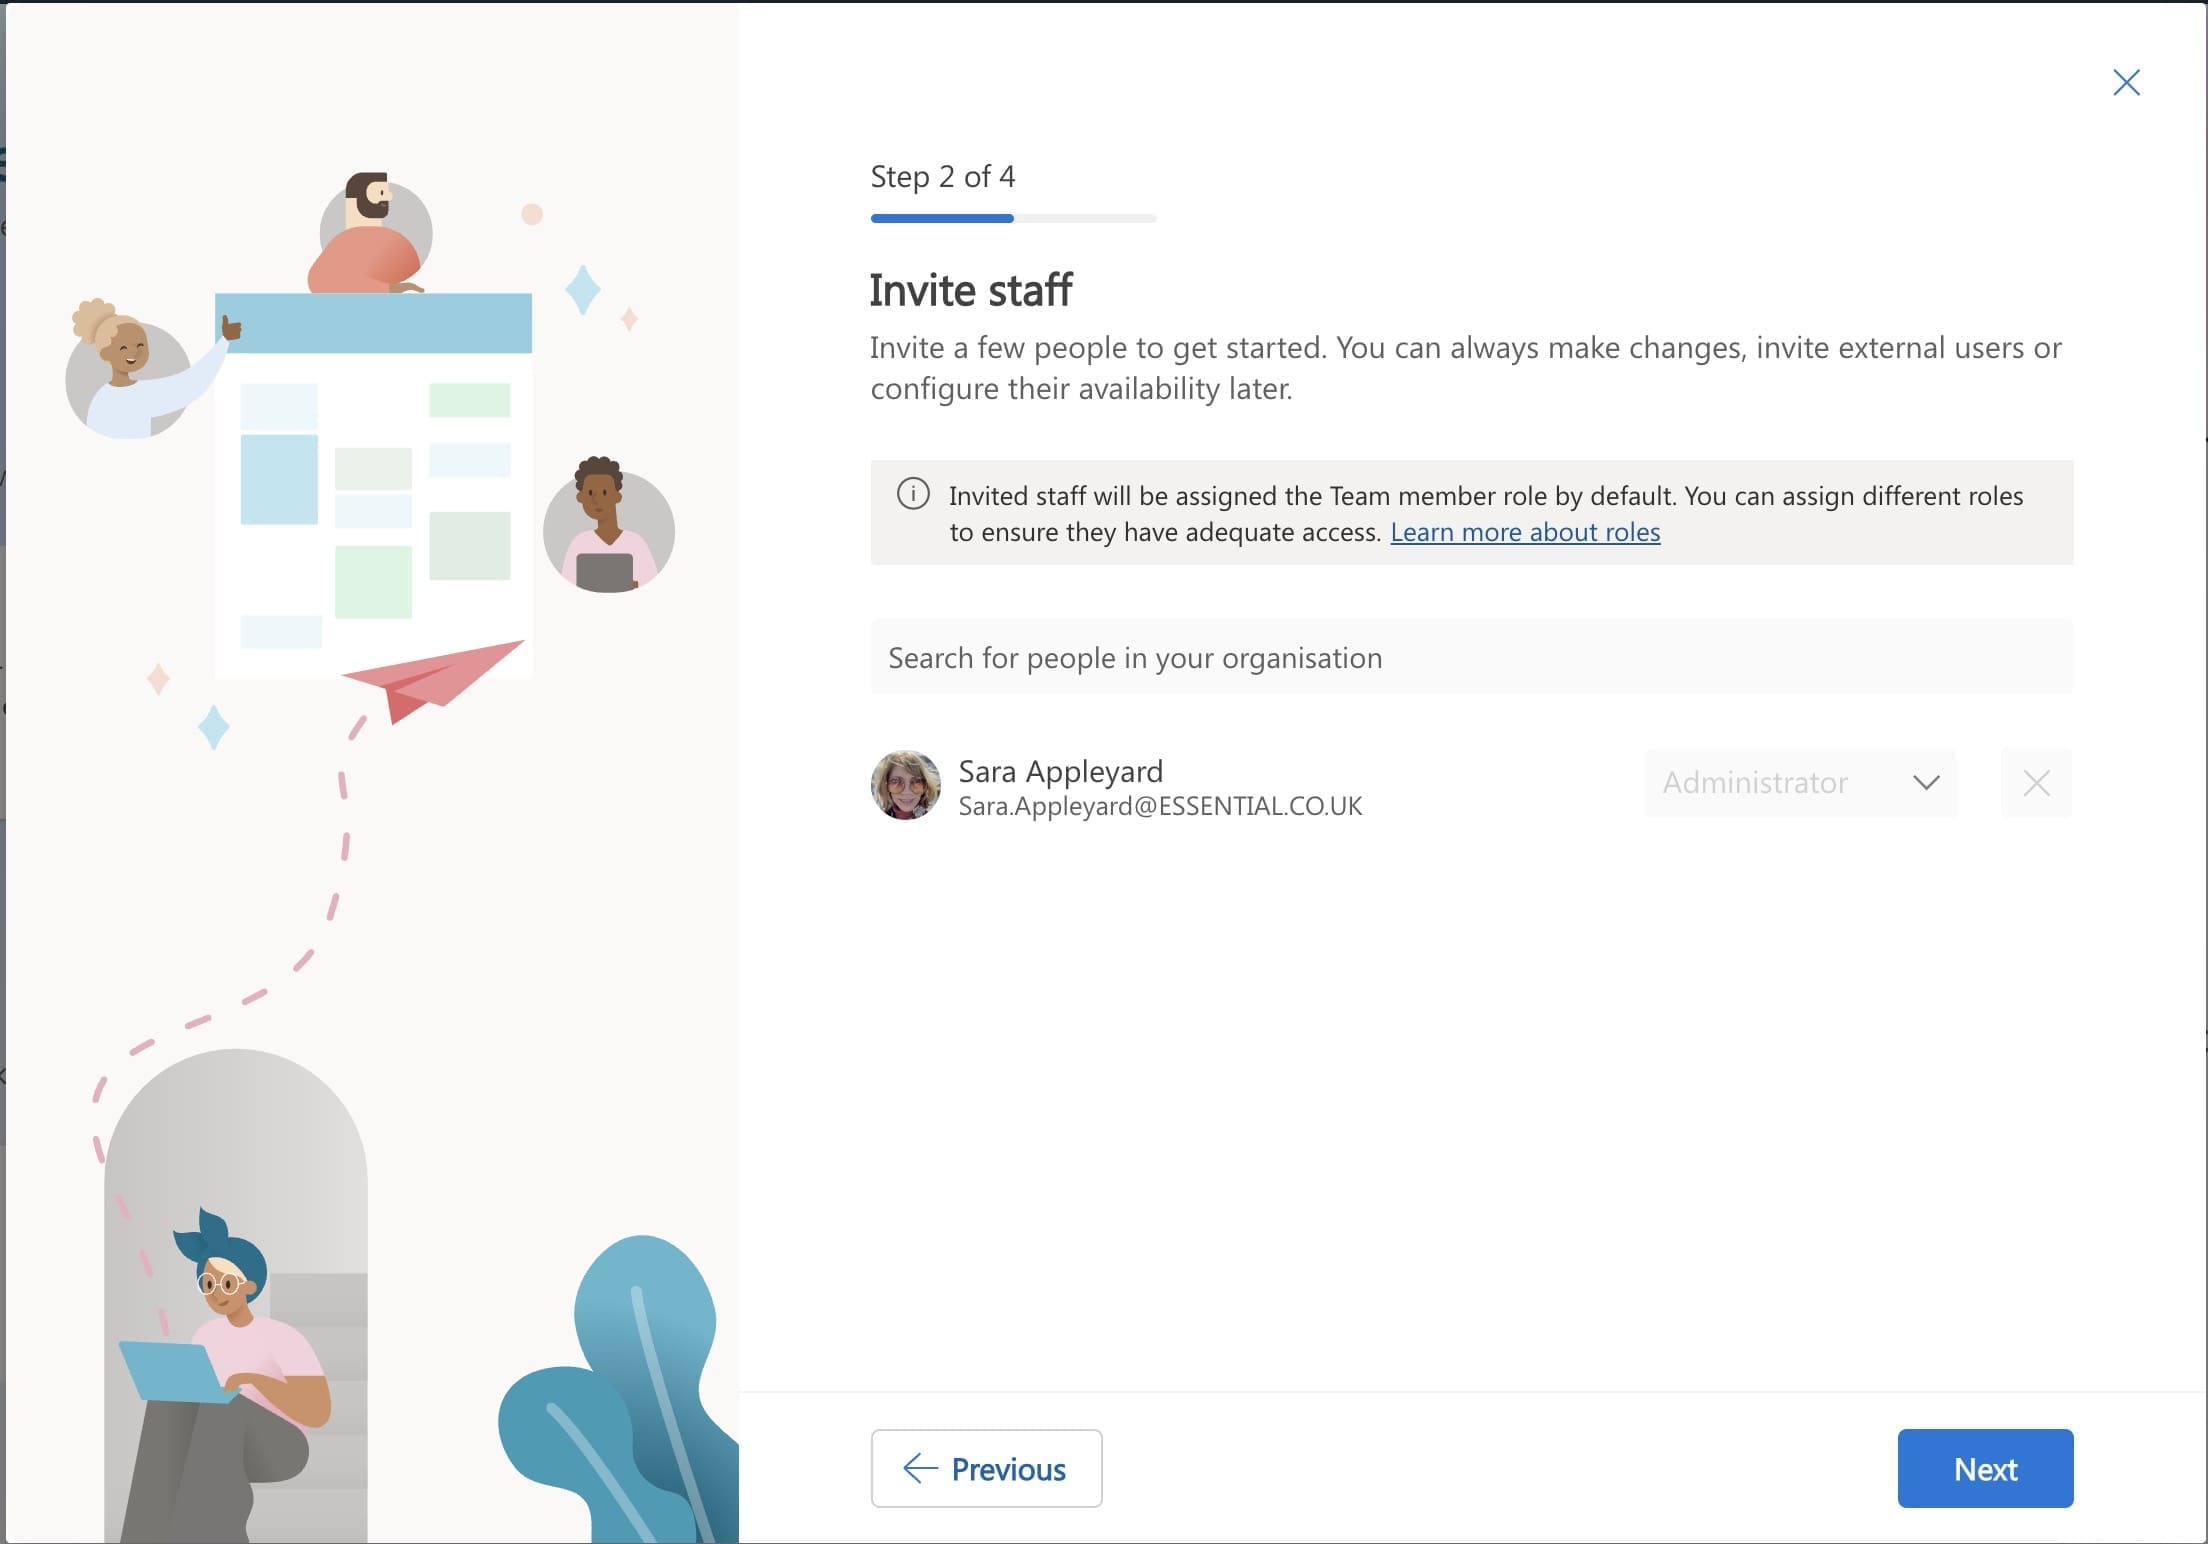
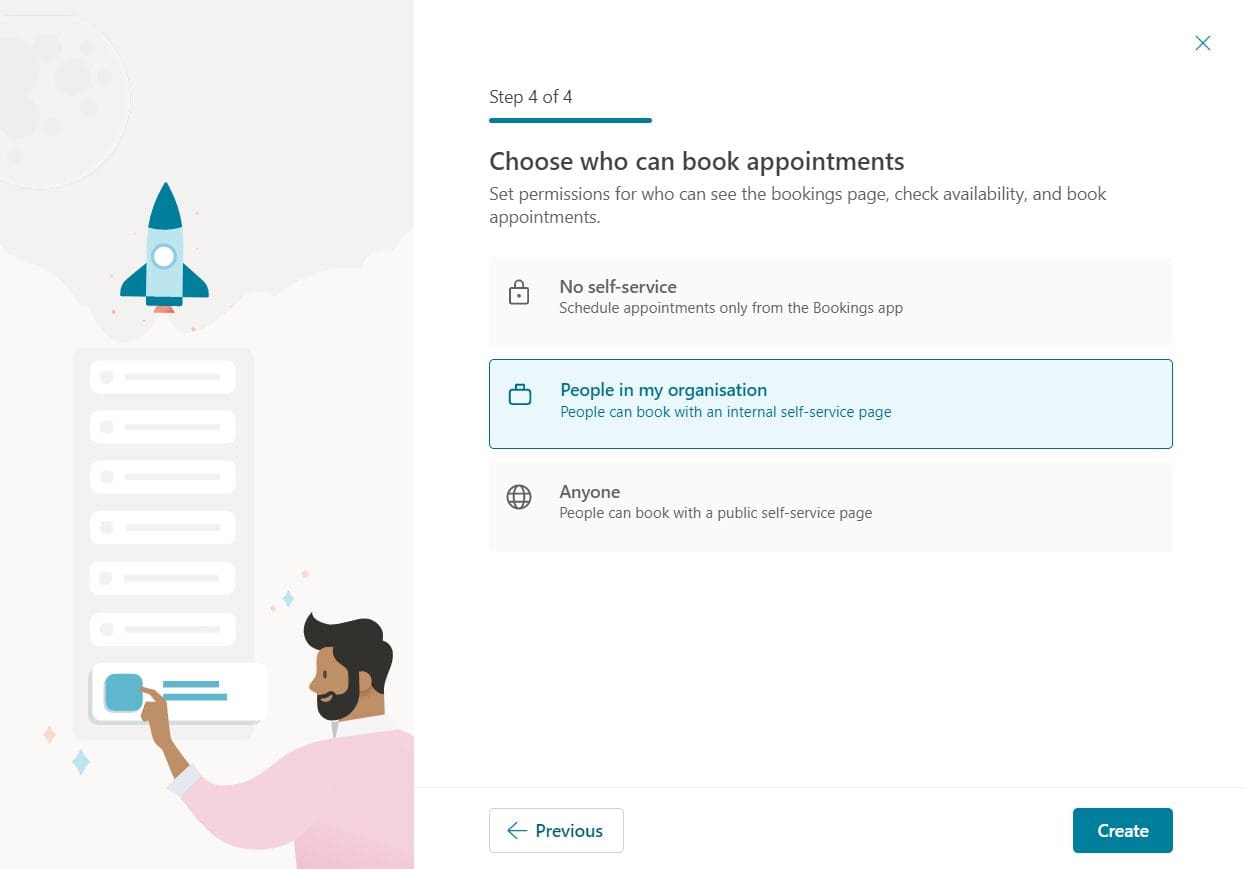
On the last page you can specify whether the booking page will be available to people within your tenant only or to anyone who has the link.
If this is for parking for your own staff only, I suggest you select ‘People in my organisation’.
After the booking service is created, you’ll be taken to the Booking Page management view from where you can start tailoring you car parking service(s).
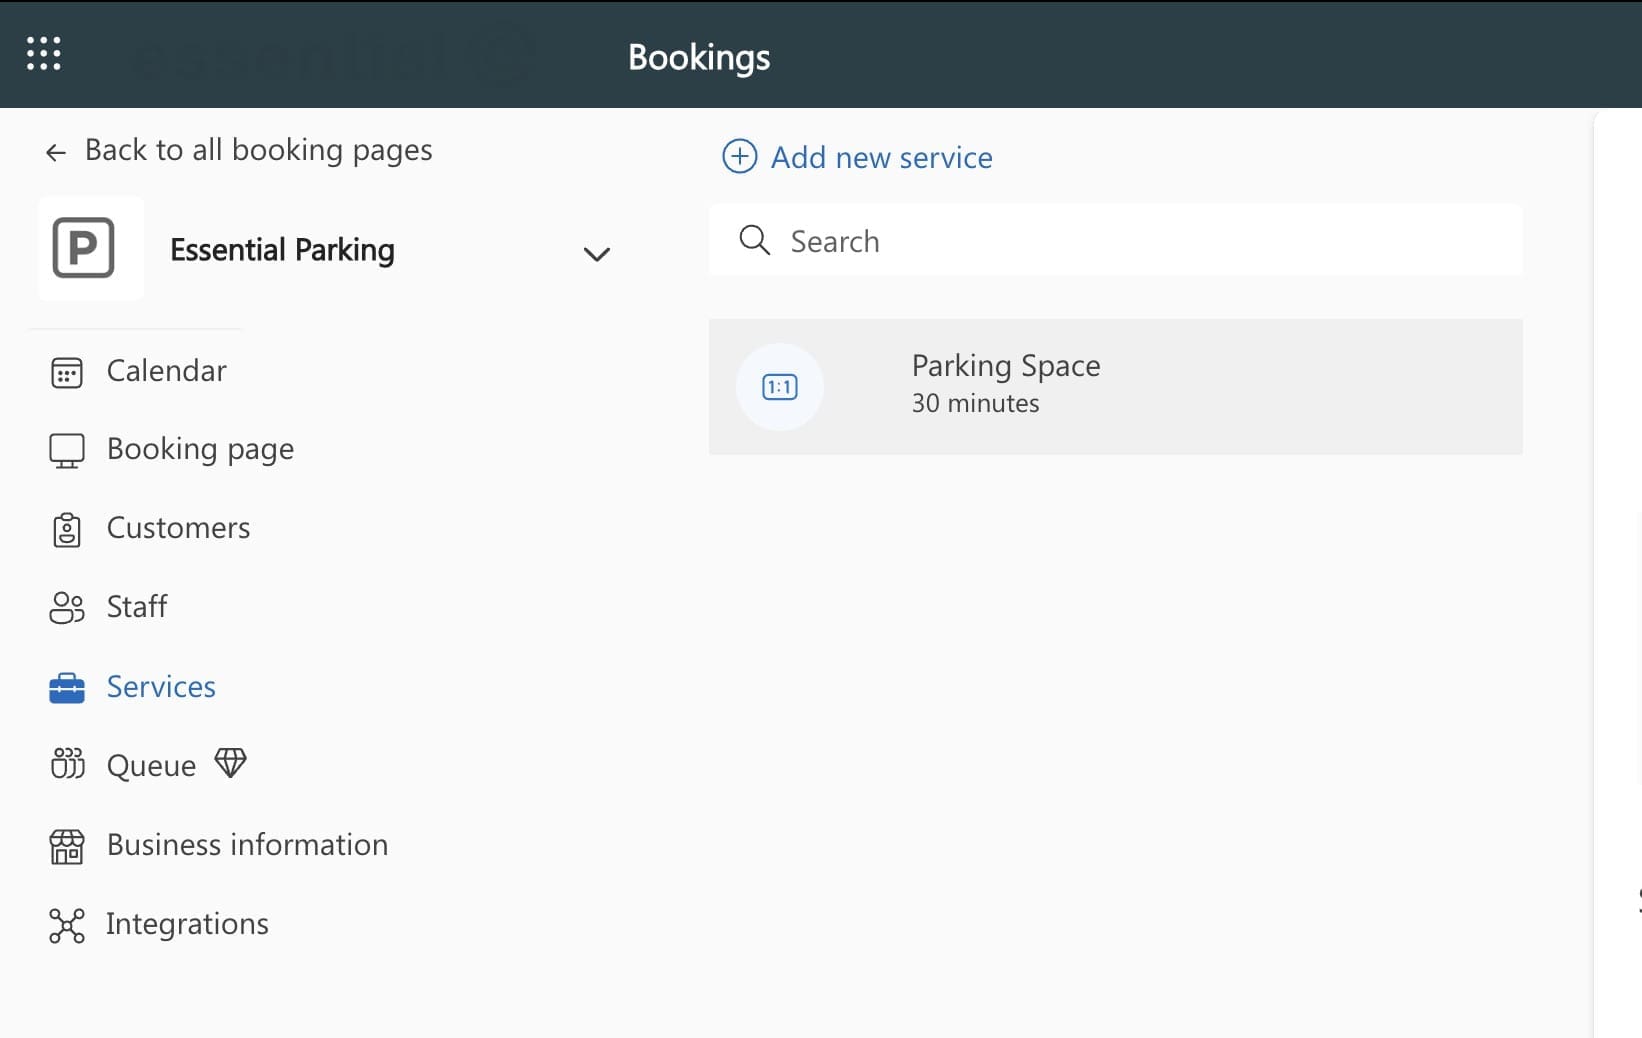
2. Creating Parking Services in Your Bookings Page
Add your parking booking service
Click on the Services setting on the left hand side of the bookings management page.
Configure the Basic details:
Service name: Name your Parking service. E.g. Bristol Parking, EV Charging Bays, Parking AM, PM, Full Day.
Description: Provide information that will help people booking a parking slot, such as gate codes or a contact number.
Location: The Location* should be used in the calendar booking location field. Use something that will help ‘bookees’ find the car park, such as a post code. We also recommend putting further instructions in the notification to the bookee (see lower down).
Turn Online Meeting Off: Make sure you don’t have the online meeting switched on, otherwise the booking will create a Teams meeting invitation!
Duration: Set the duration available for bookings, here we’ve assumed a full day booking.**
Buffer time: If you want to offer bookings that are for less than a day (see lower in this section) a buffer time will allow for delayed departure and early arrivals.
Price: We’ll assume this is free but you may wish to apply a charge that will be ‘cross-charged’ internally.
Notes: This is for internal ‘admin’ information only – such as ‘Note that parking is also available on an AM or PM basis, please also see these services for all bookings’.
Maximum number of attendees: For ‘maximum number of attendees’ set the number of parking bays you have available. Each time a booking is made on the resource this number will be decremented by 1.
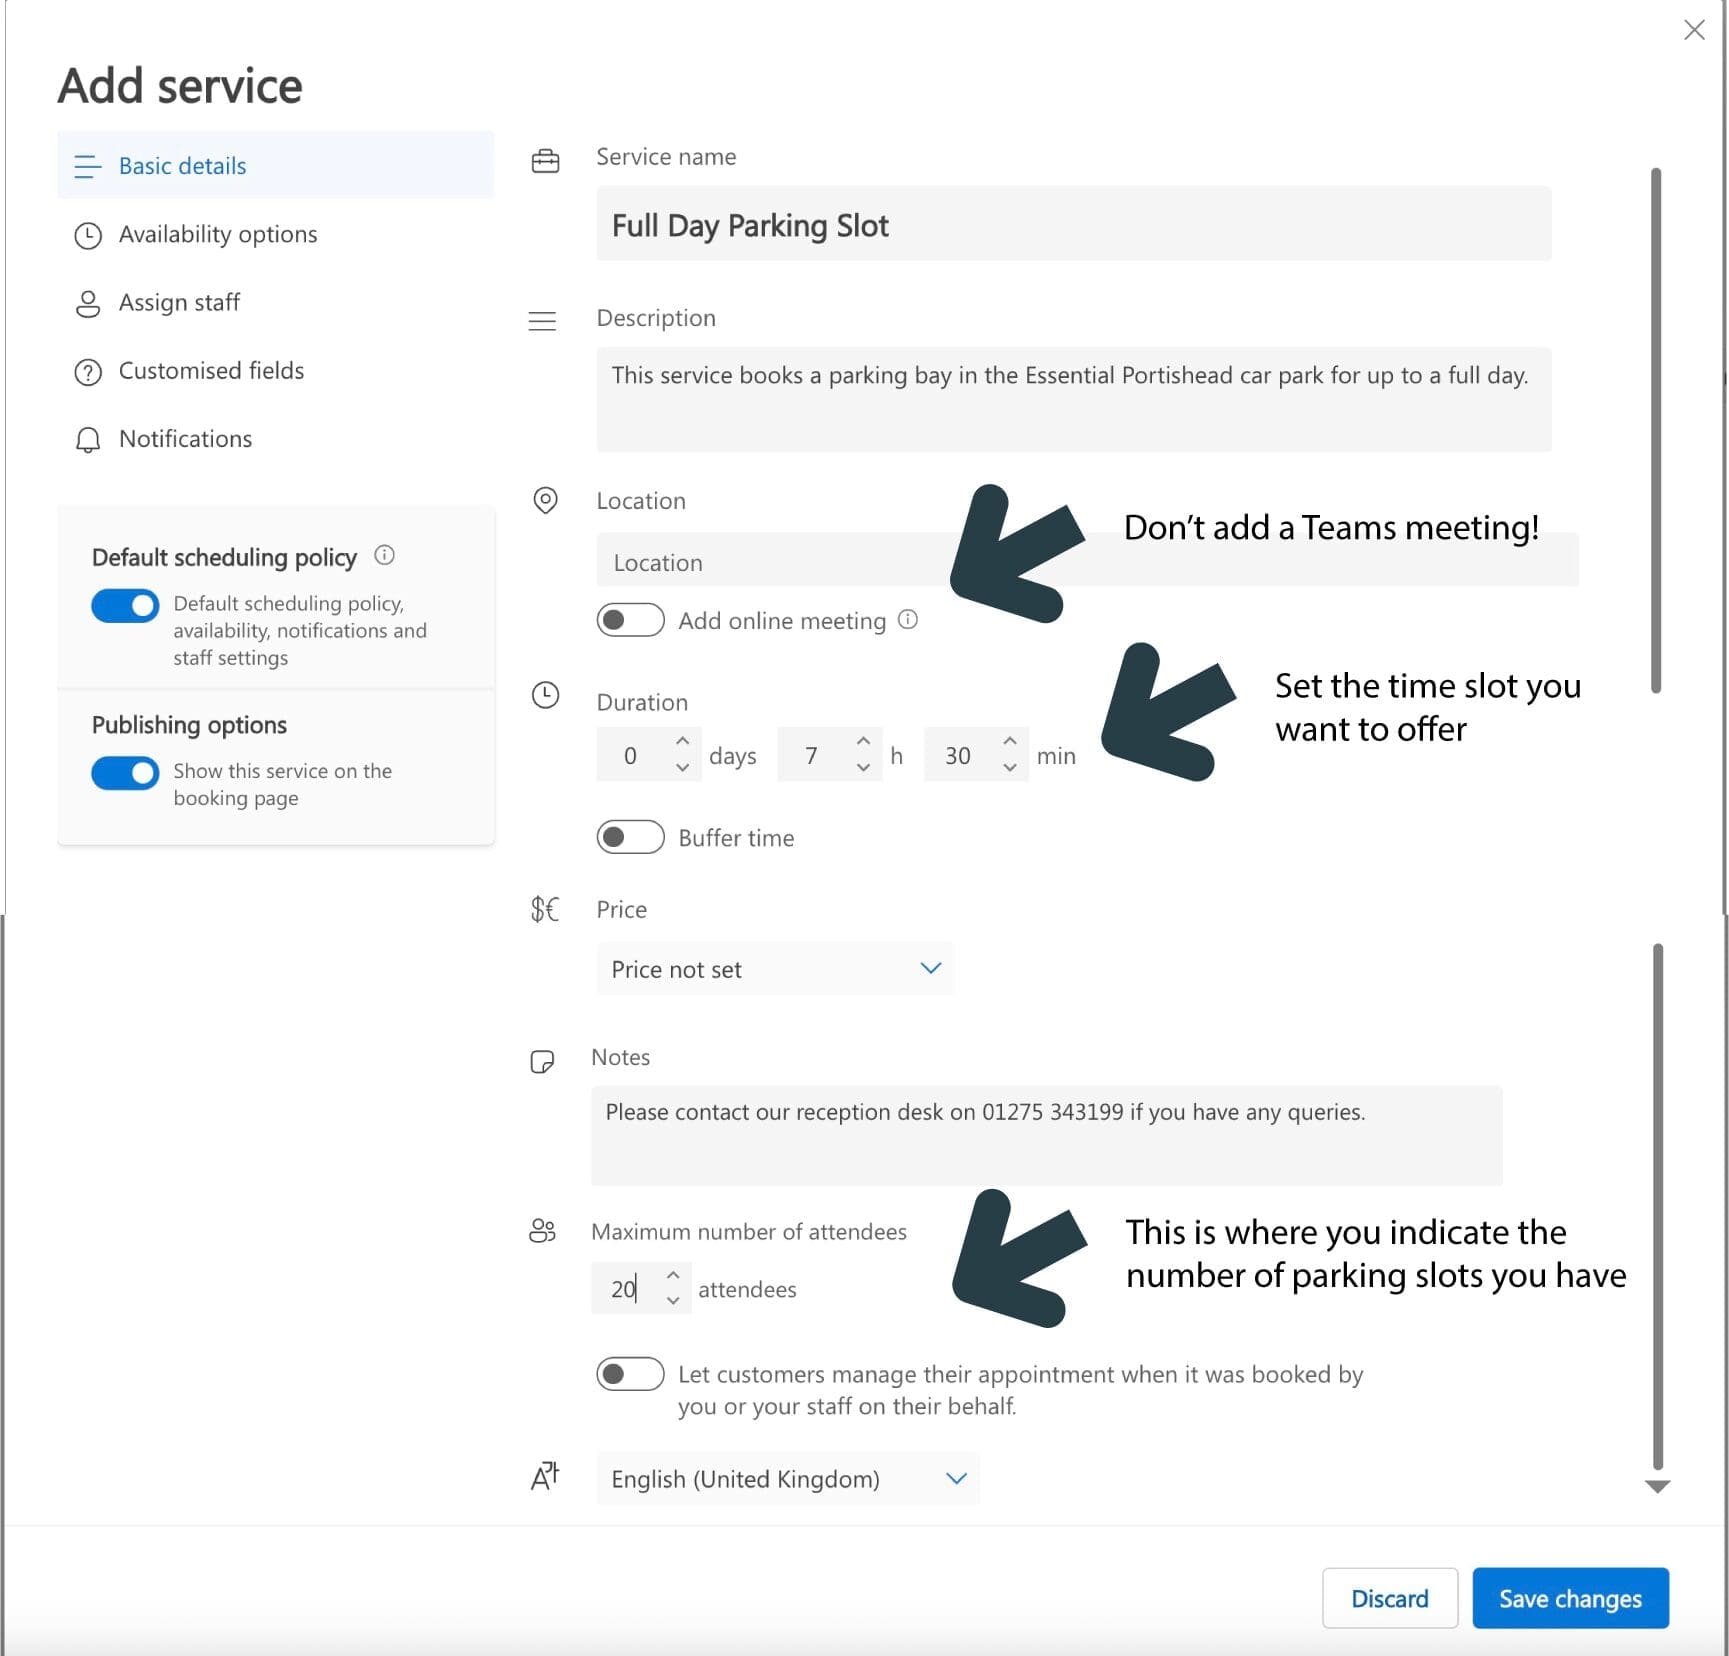
Click Save Changes.
*What if you have multiple office (and car park) nlocations?
If you have multiple office locations, we recommend you name your services accordingly. E.g. Parking Bristol, Parking London.
If you have multiple locations, and in each location you want to offer AM, PM, Full day, you may want to set up a Booking page per location to improve the management UX.
**What if you want to offer half day parking?
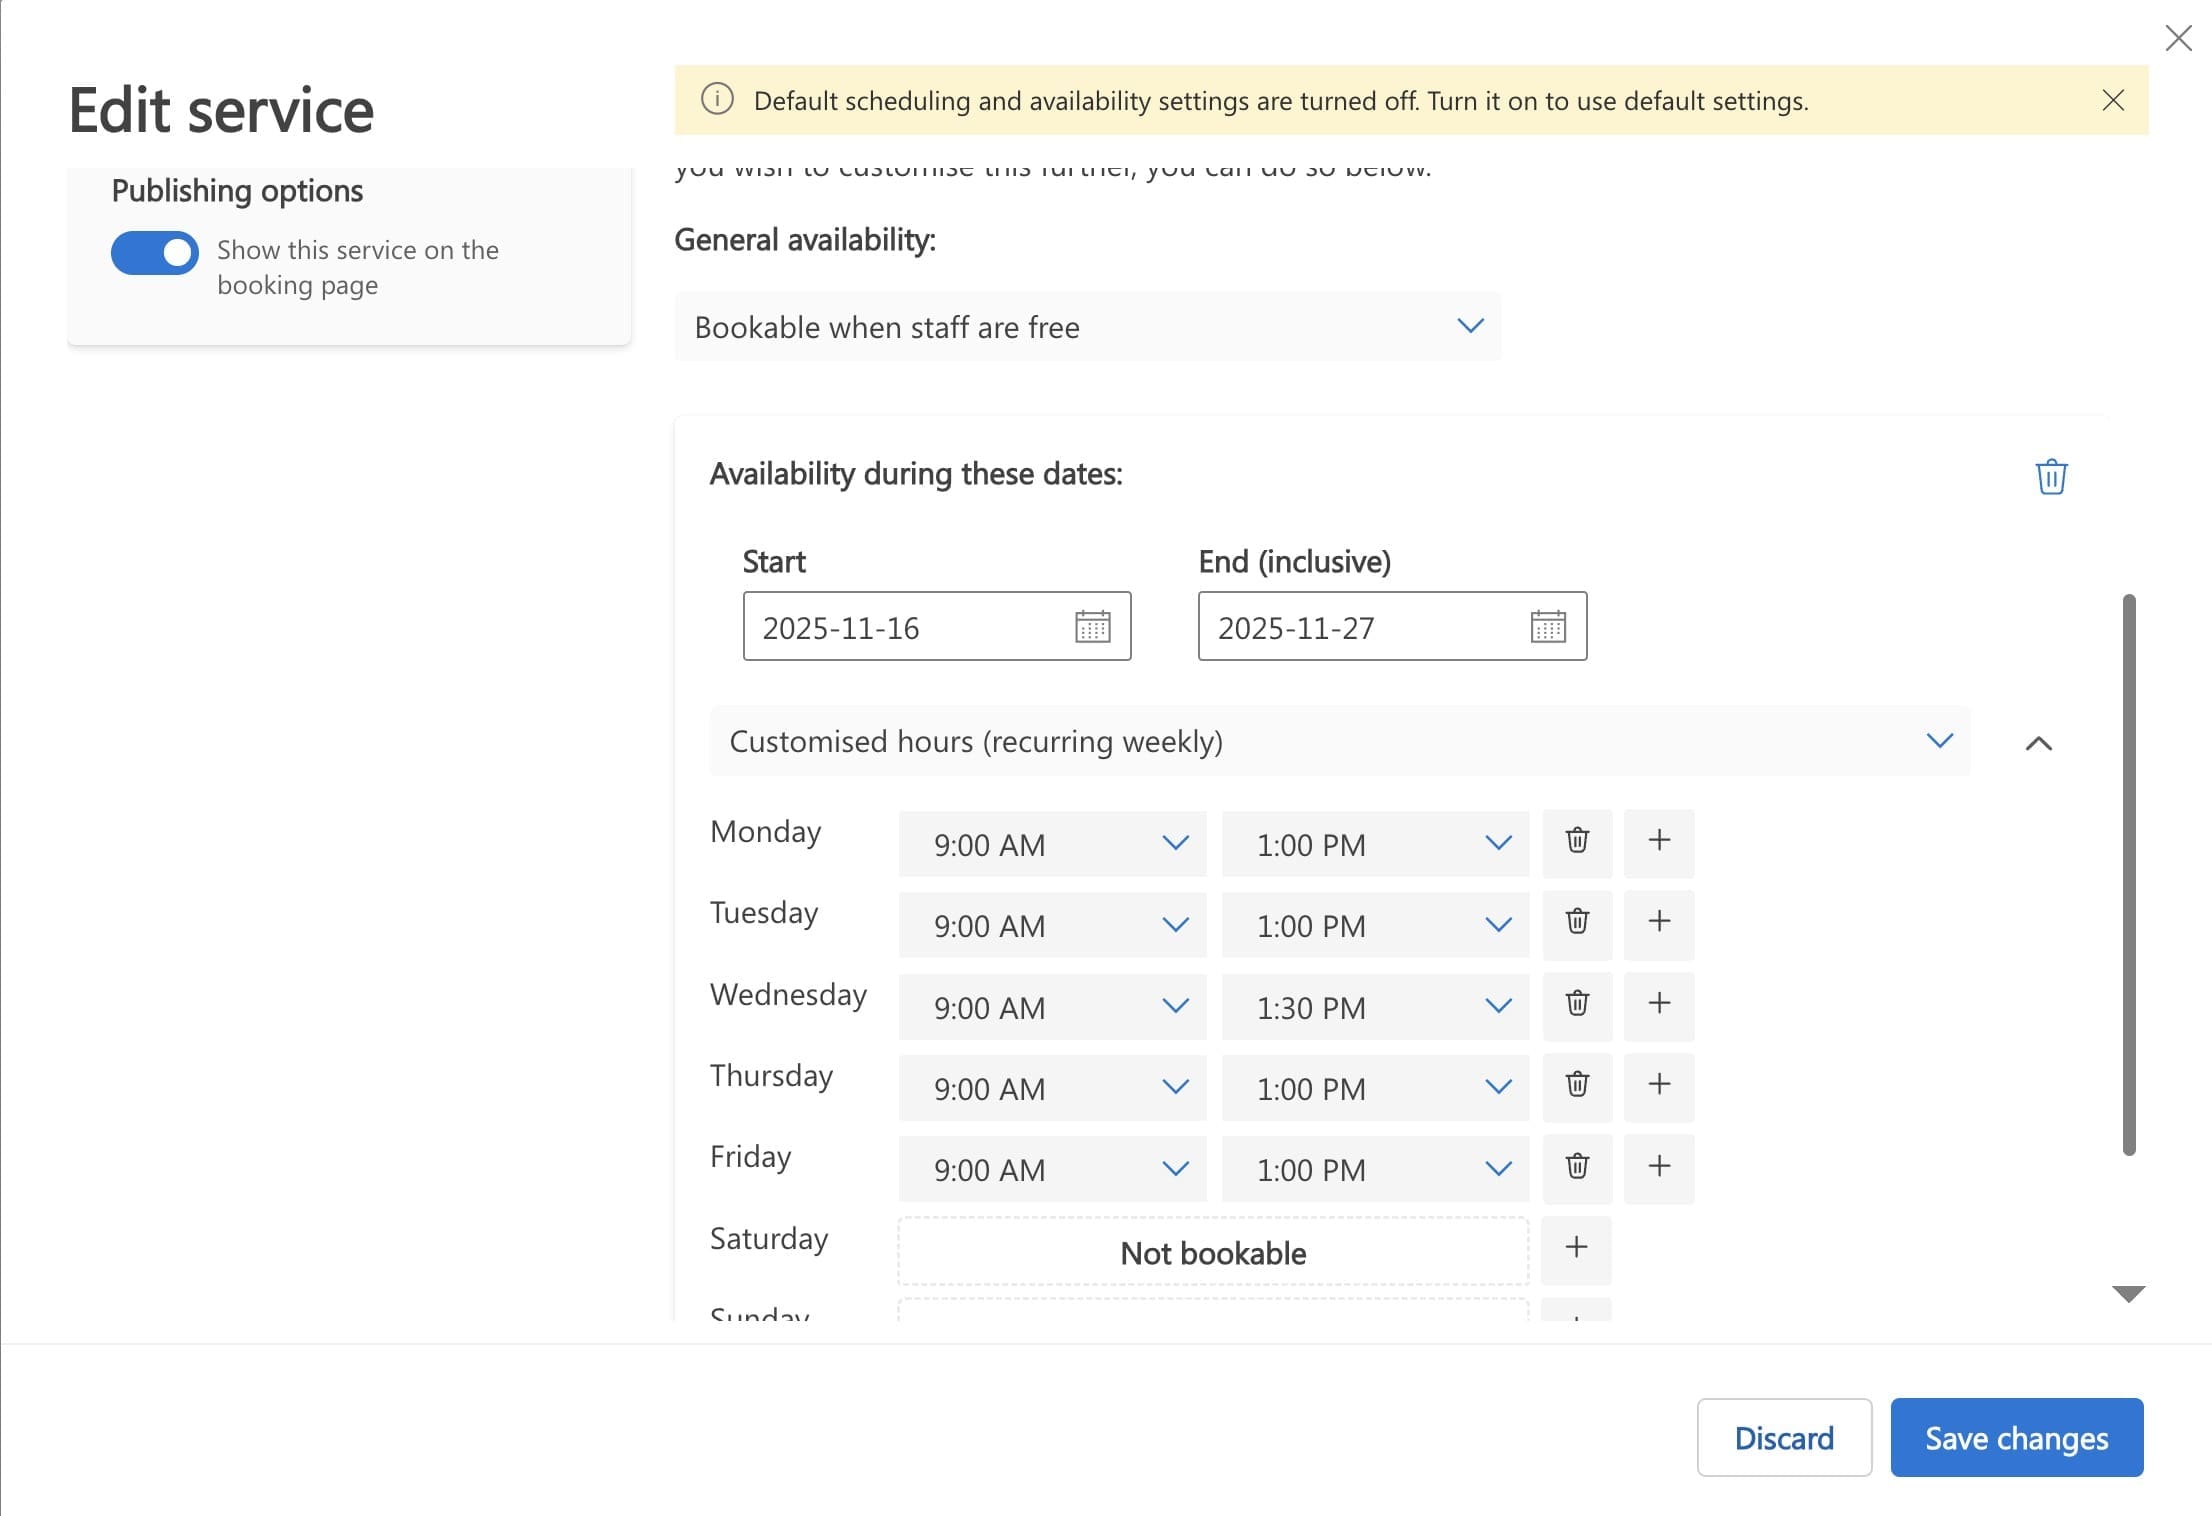
If you wish to create half day booking slots, i.e., AM and PM as well as a whole day booking, you will need to create 3 separate services, editing the ‘hours’ for the AM & PM slots accordingly using the Availability Options.
For example, below shows the settings you might choose for your AM parking slots.
Along with this setting you may wish to add a buffer time on the Basic settings option to allow for over-runs and early arrivals.
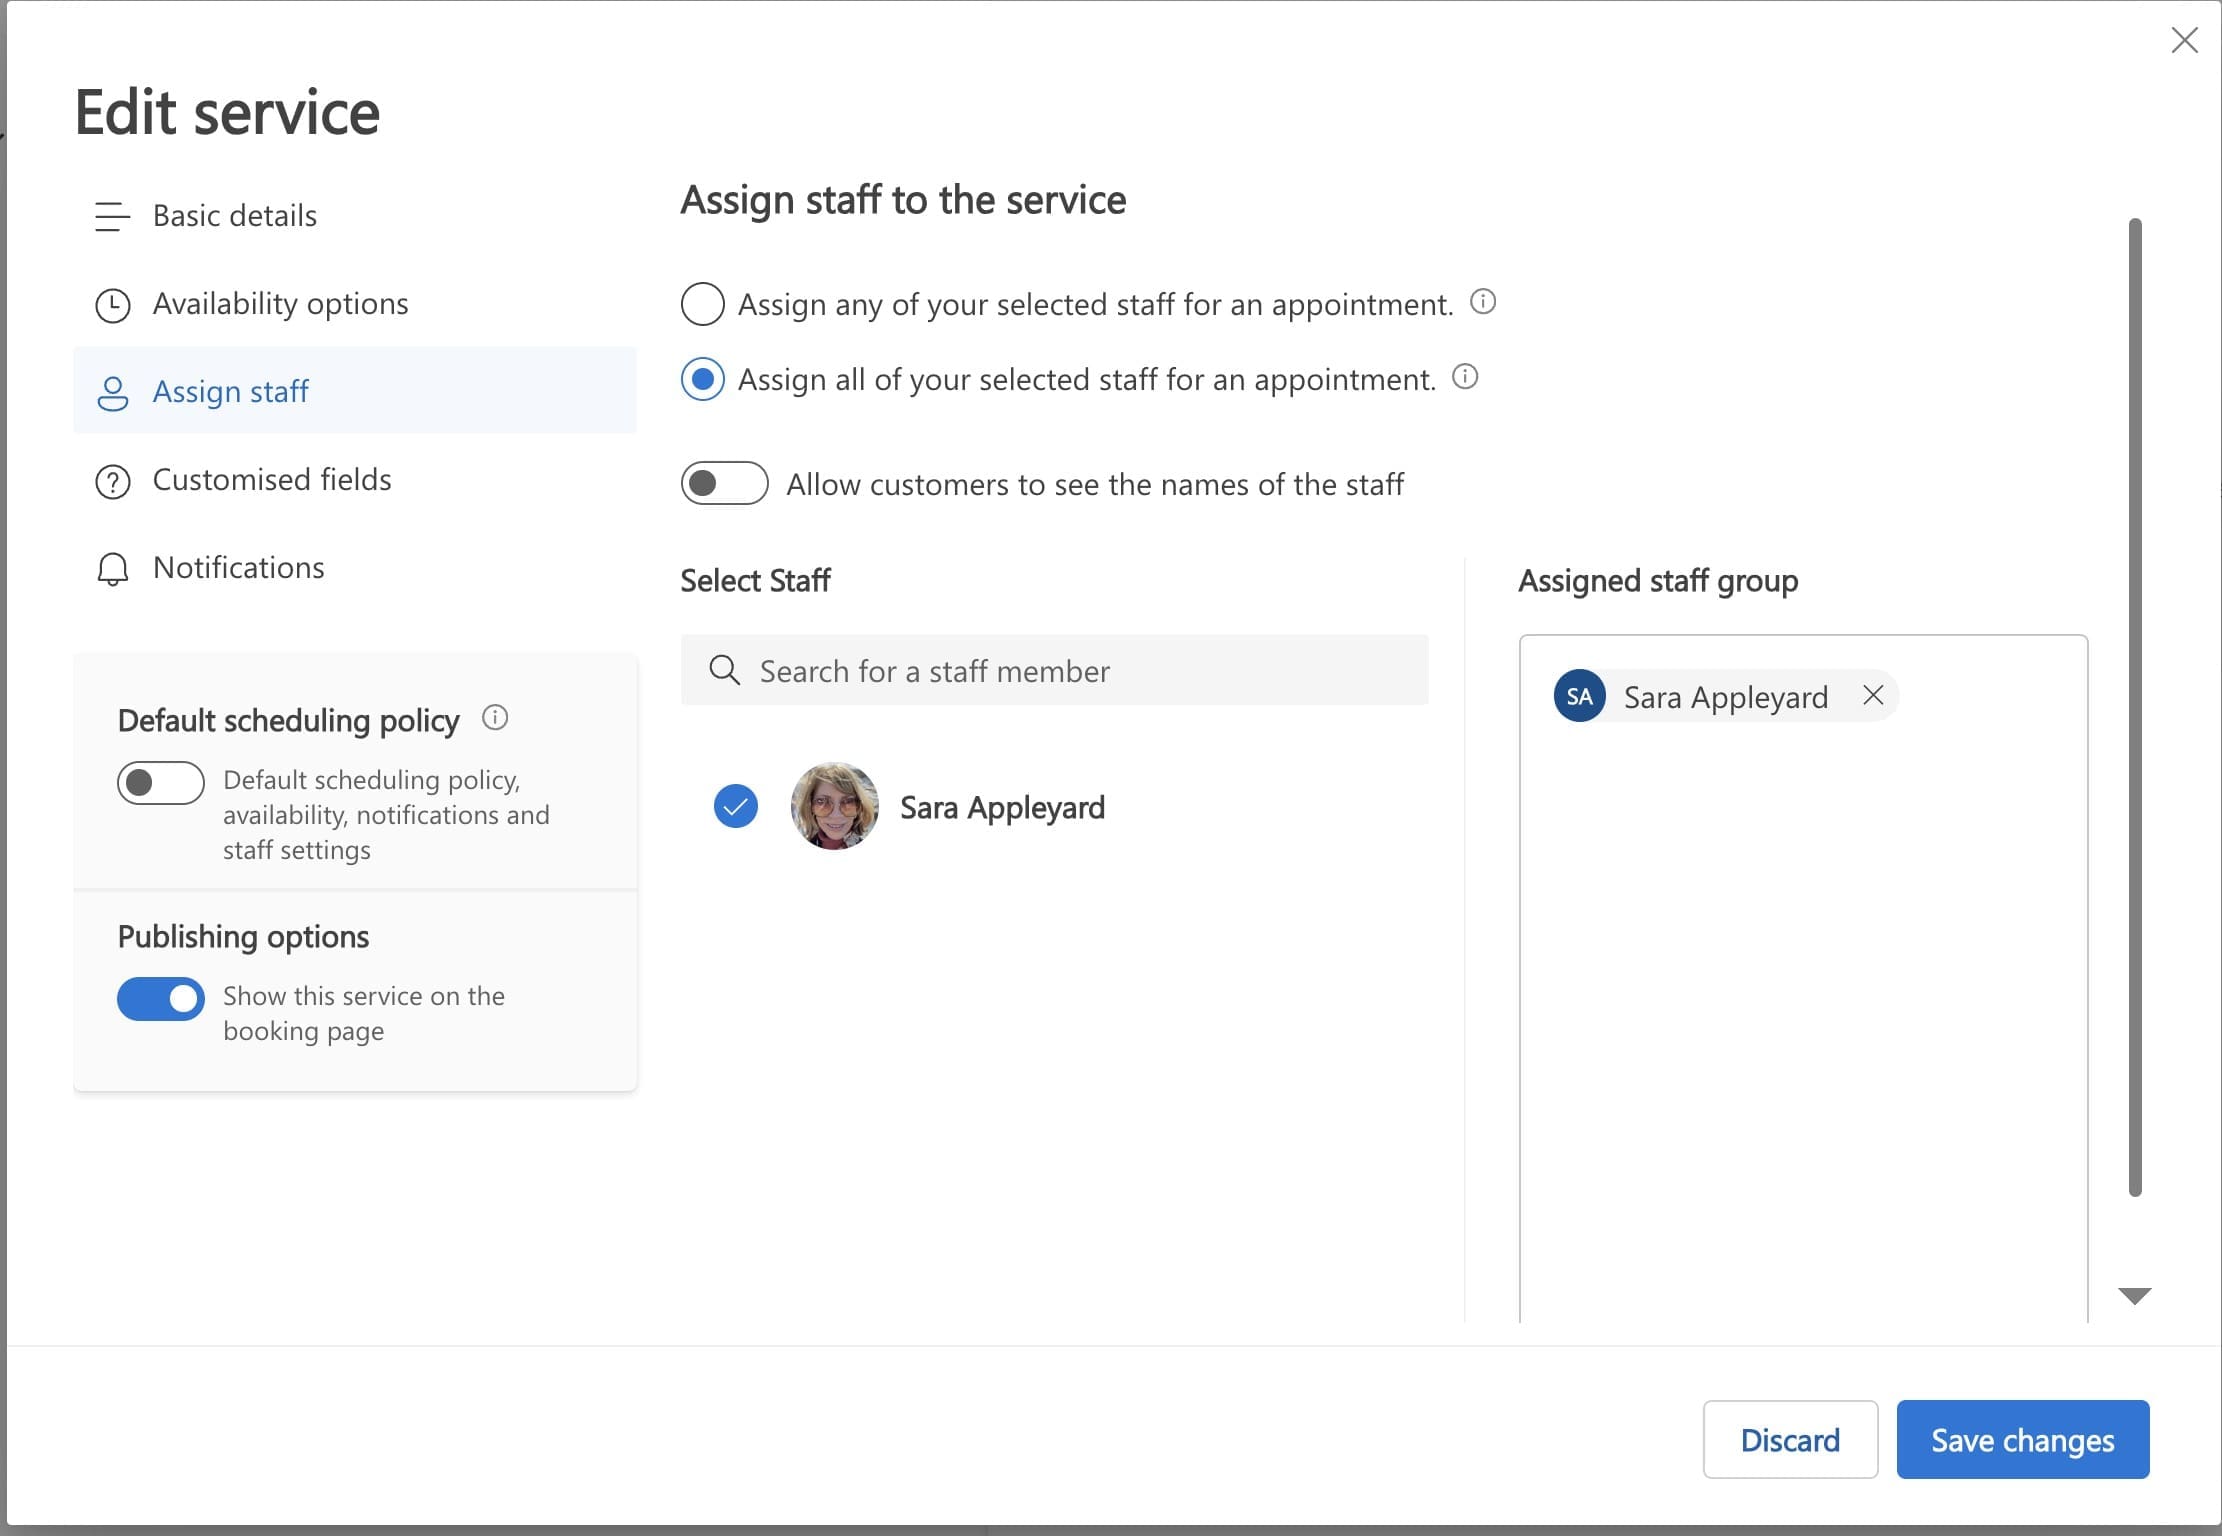
Assign ‘staff’
If you’re just testing for now, add yourself as the assigned staff member (Admin).
If in the future you start using your parking booking service service, you may wish to change this to be a designated parking admins, such as a facilities person or a shared mailbox belonging to the security/reception team, so they can see who’s booked in for the car park on any given day.
Also select ‘Assign all of your selected staff for an appointment’ and disable ‘Allow customers to see names of the staff’
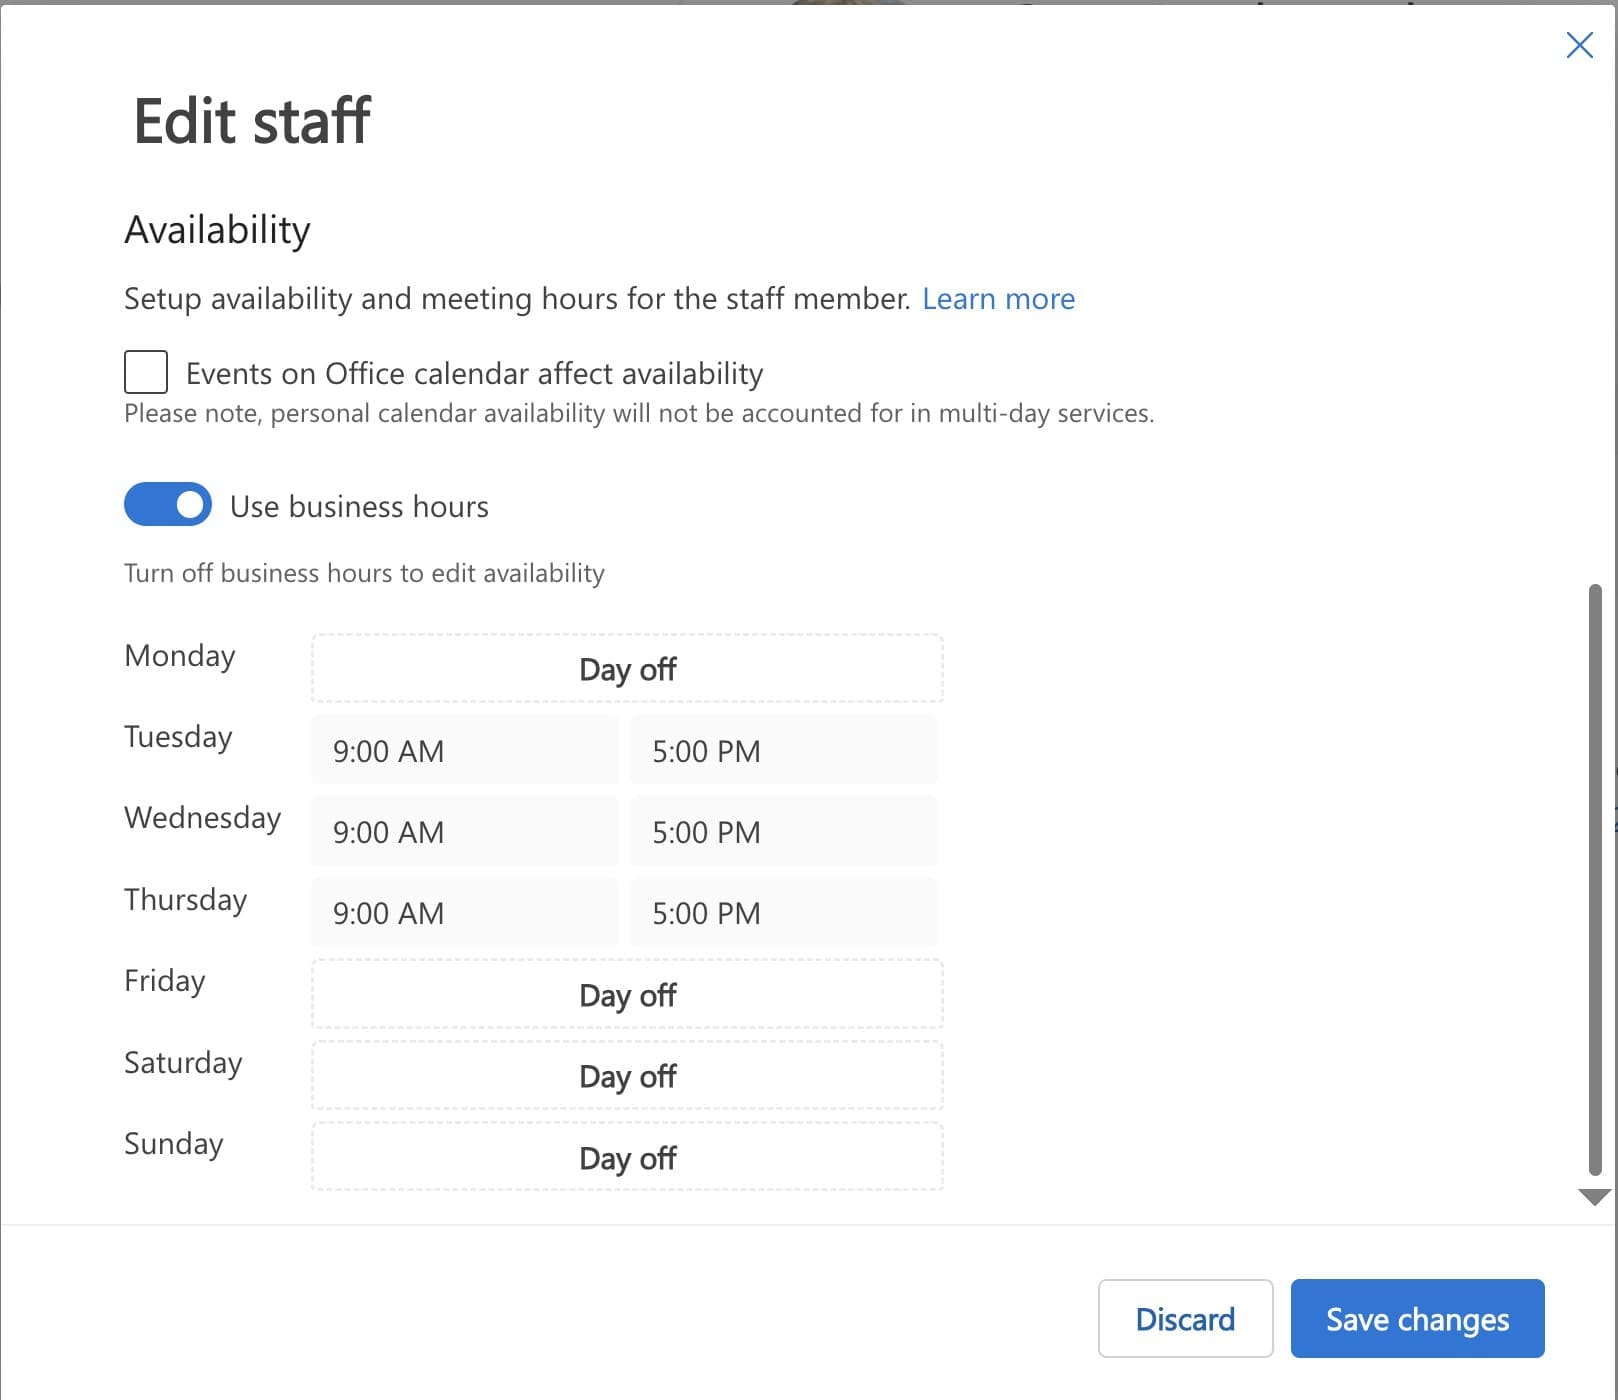
Edit Staff Availability
By default, Bookings checks the Outlook calendar belonging to the ‘assigned staff’ for free time to avoid double-bookings.
As parking is not a ‘personally delivered service’ per se, this is not applicable, and any pre-existing appointments in their calendars could stop your parking app from working.
To fix this, use the ‘Edit Staff’ option and untick ‘Events on Office calendar affect availability’
Edit Notifications
Here you can change up the confirmations and reminders sent out.
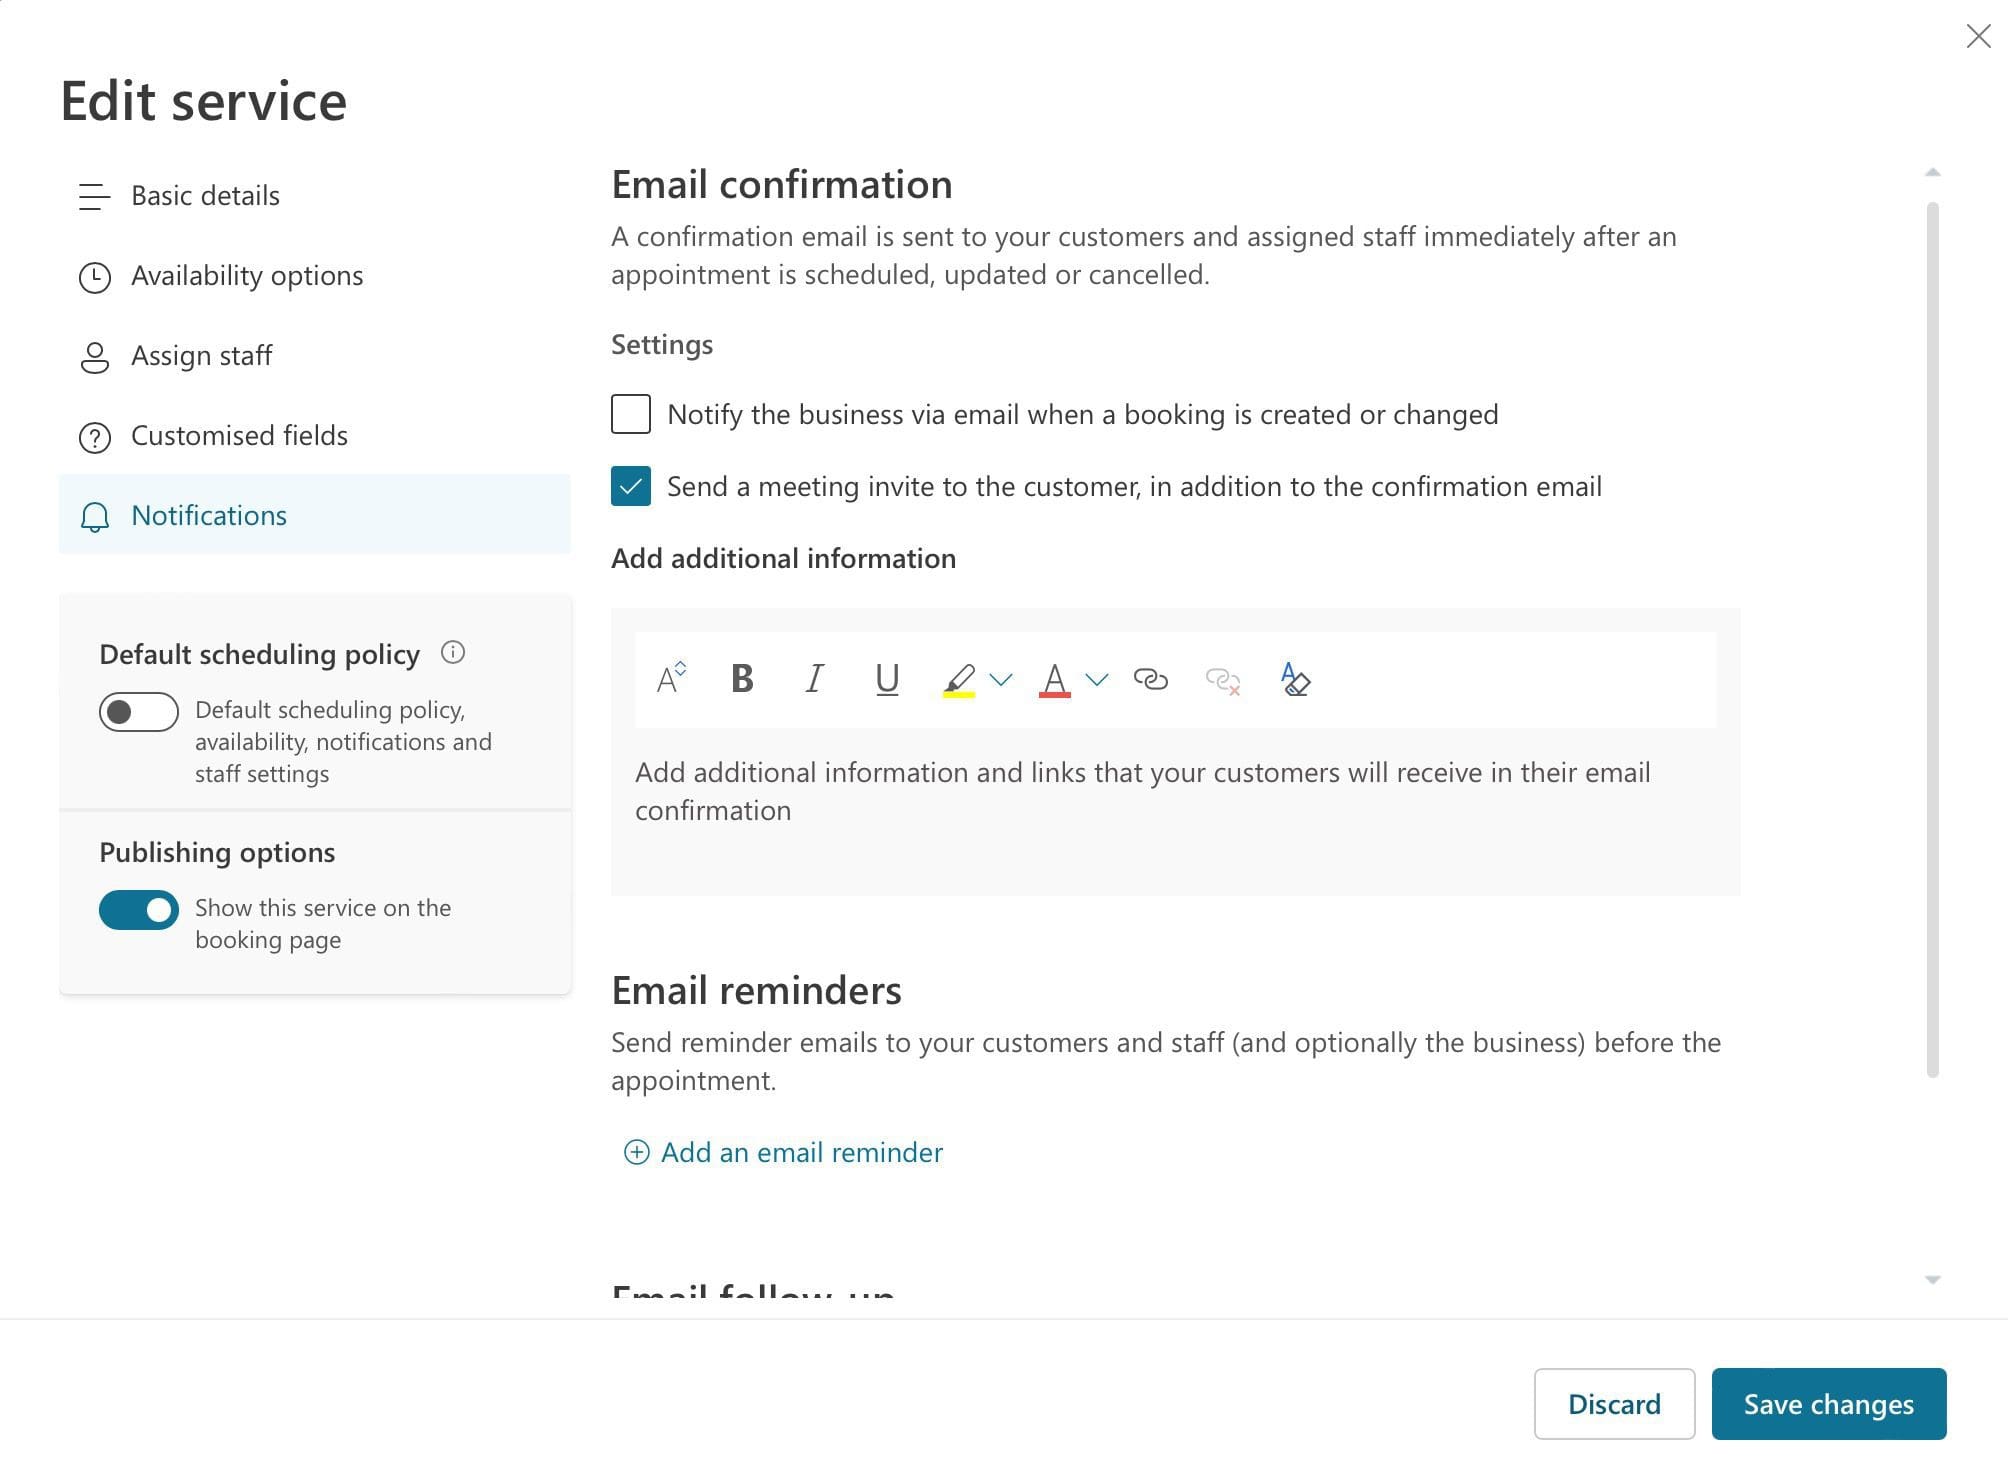
- If you don’t select ‘Send a meetng invite…’ it would seem that bookees will received an invitation with an ICS file attached
- You can tailor the content in the email confirmation. E.g., you might include a link to a map showing the location of the car parking bays and any other information. You might also want to include something like this:
IMPORTANT: If you want to cancel your booking, use the Reschedule link in the confirmation email or ‘Manage Booking’ in Teams. Cancelling the calendar appointment will not remove your booking. Please call 01275 343199 if you have any problems cancelling your booking. - Tips to help bookees avoid having the calendar invitation showing their time as ‘busy’ mght also be handy – see later in this article.
- You can also configure email reminders regarding their booking. A 1-day reminder is enabled by default.
- A follow up email that invites feedback about the service is added by default. You can delete this if you want.
Customise fields
Here you can change up the information that the bookee is prompted for.
Whatever you do here, don’t remove the email field from the Customised fields options or make it optional, otherwise you risk the email notification not being sent to the bookee.
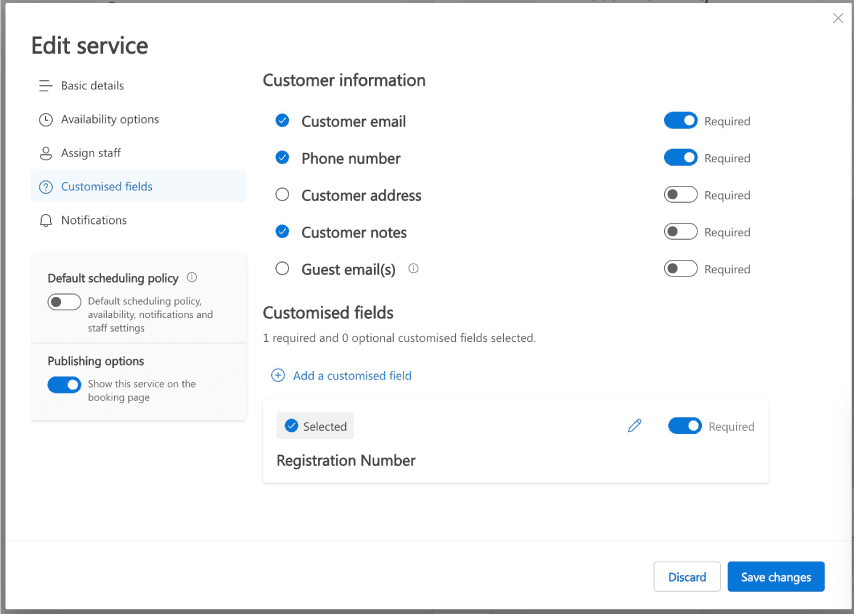
The other thing you might like to add to the information collected on the booking form is the car registration number.
Finally I suggest you have the default scheduling policy set to on. This means that each new service you create (like AM Parking or PM Parking) will automatically inherit any defaults.
If you didn’t set scheduling defaults when you created the booking page (in step 1) you can go back and set these using the Business information option in the booking management view.
3. Publish Your Parking Booking Service
Now your system is configured, you can share the link with those that need it.
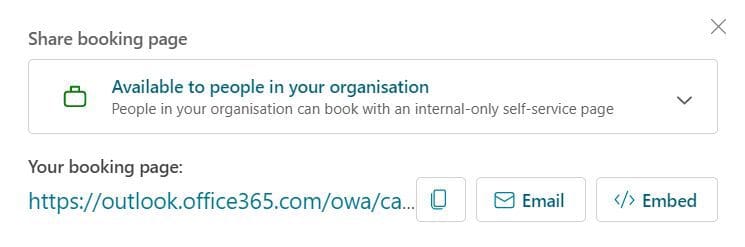
It is also possible to create a link to embed the booking page into SharePoint and/or your Teams Places App Explore tab (only available for Teams Premium users).
4. Test Your Parking Booking System
The End User (Bookee) Experience
If the bookee is not already signed into their Microsoft tenant, they’ll need to do this first.
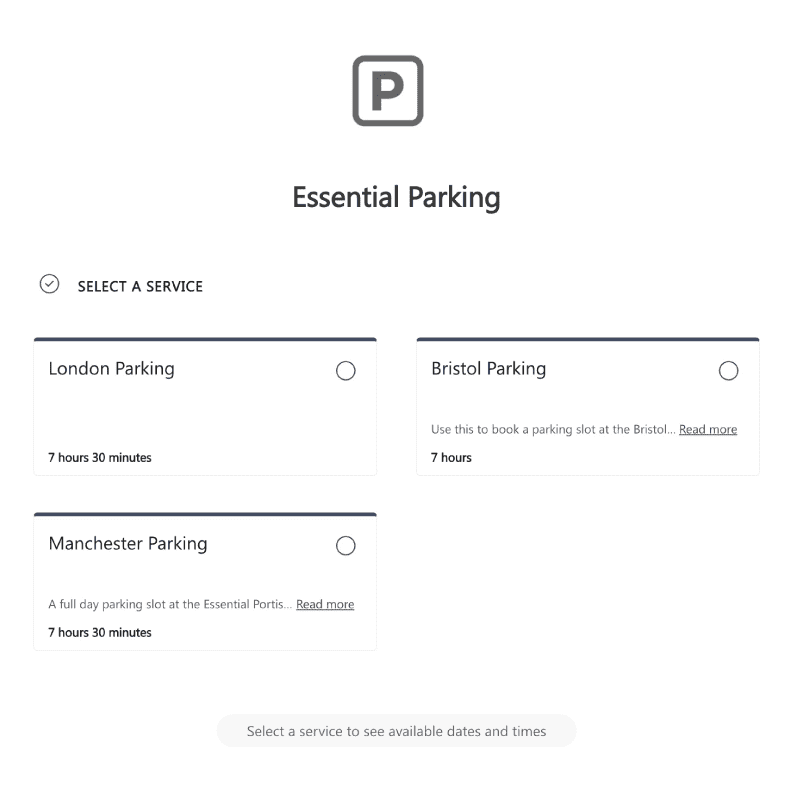
From the supplied bookings page link (which could be a single service or multiple services), they can click on the booking service they want, and select the date and time to park.
Below is an example of where you might have multiple locations to choose from. This is one booking page with 3 parking services defined.
TIP: If you have multiple locations each with multiple time slots AM, PM, or Full Day, you may wish to create separate Booking pages for each location to ensure a simple UX.
If you’re an internal user your contact details will typically be pre-populated. If for some reason the email address is not populated, the booking confirmation will not come through.
As you can see below, the form has been edited to prompt for the car registration number.

Bookees will get a booking confirmation email. If during the service configuration you omit to tick ‘Send a meeting invitation in addition to a notification email’, the default is that an email with an ICS attachment will be sent.
Note that the ICS marks the appointment as ‘tentative’, which is Outlook’s default behaviour for ICS imports.
CAUTION: The other thing to watch out for is that, by default, both the regular calendar invitation and the ICS booking will mark the bookee’s time as busy.
You’ll want to advise users of the system to set their time as ‘Free’ instead.
As I said earlier, I recommend you add the location info and tips on cancelling a booking into the additional information you set up in your service description and email notification.

There’s a Reschedule link that takes the ‘bookee’ to a Booking page from where the booking can be rescheduled or cancelled.
Bookees will also get a ‘chat’ and Teams calendar invitation in Teams, both of which include a link for them to Manage their booking.
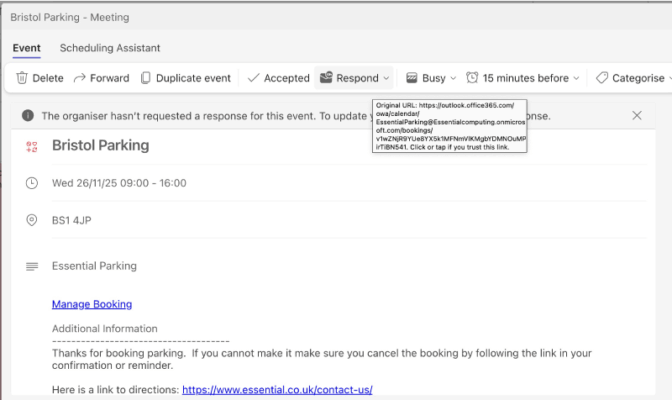
Both the Reschedule link in the Outlook email confirmation and the Manage Bookings link in Teams will take bookees to a page that looks like this:
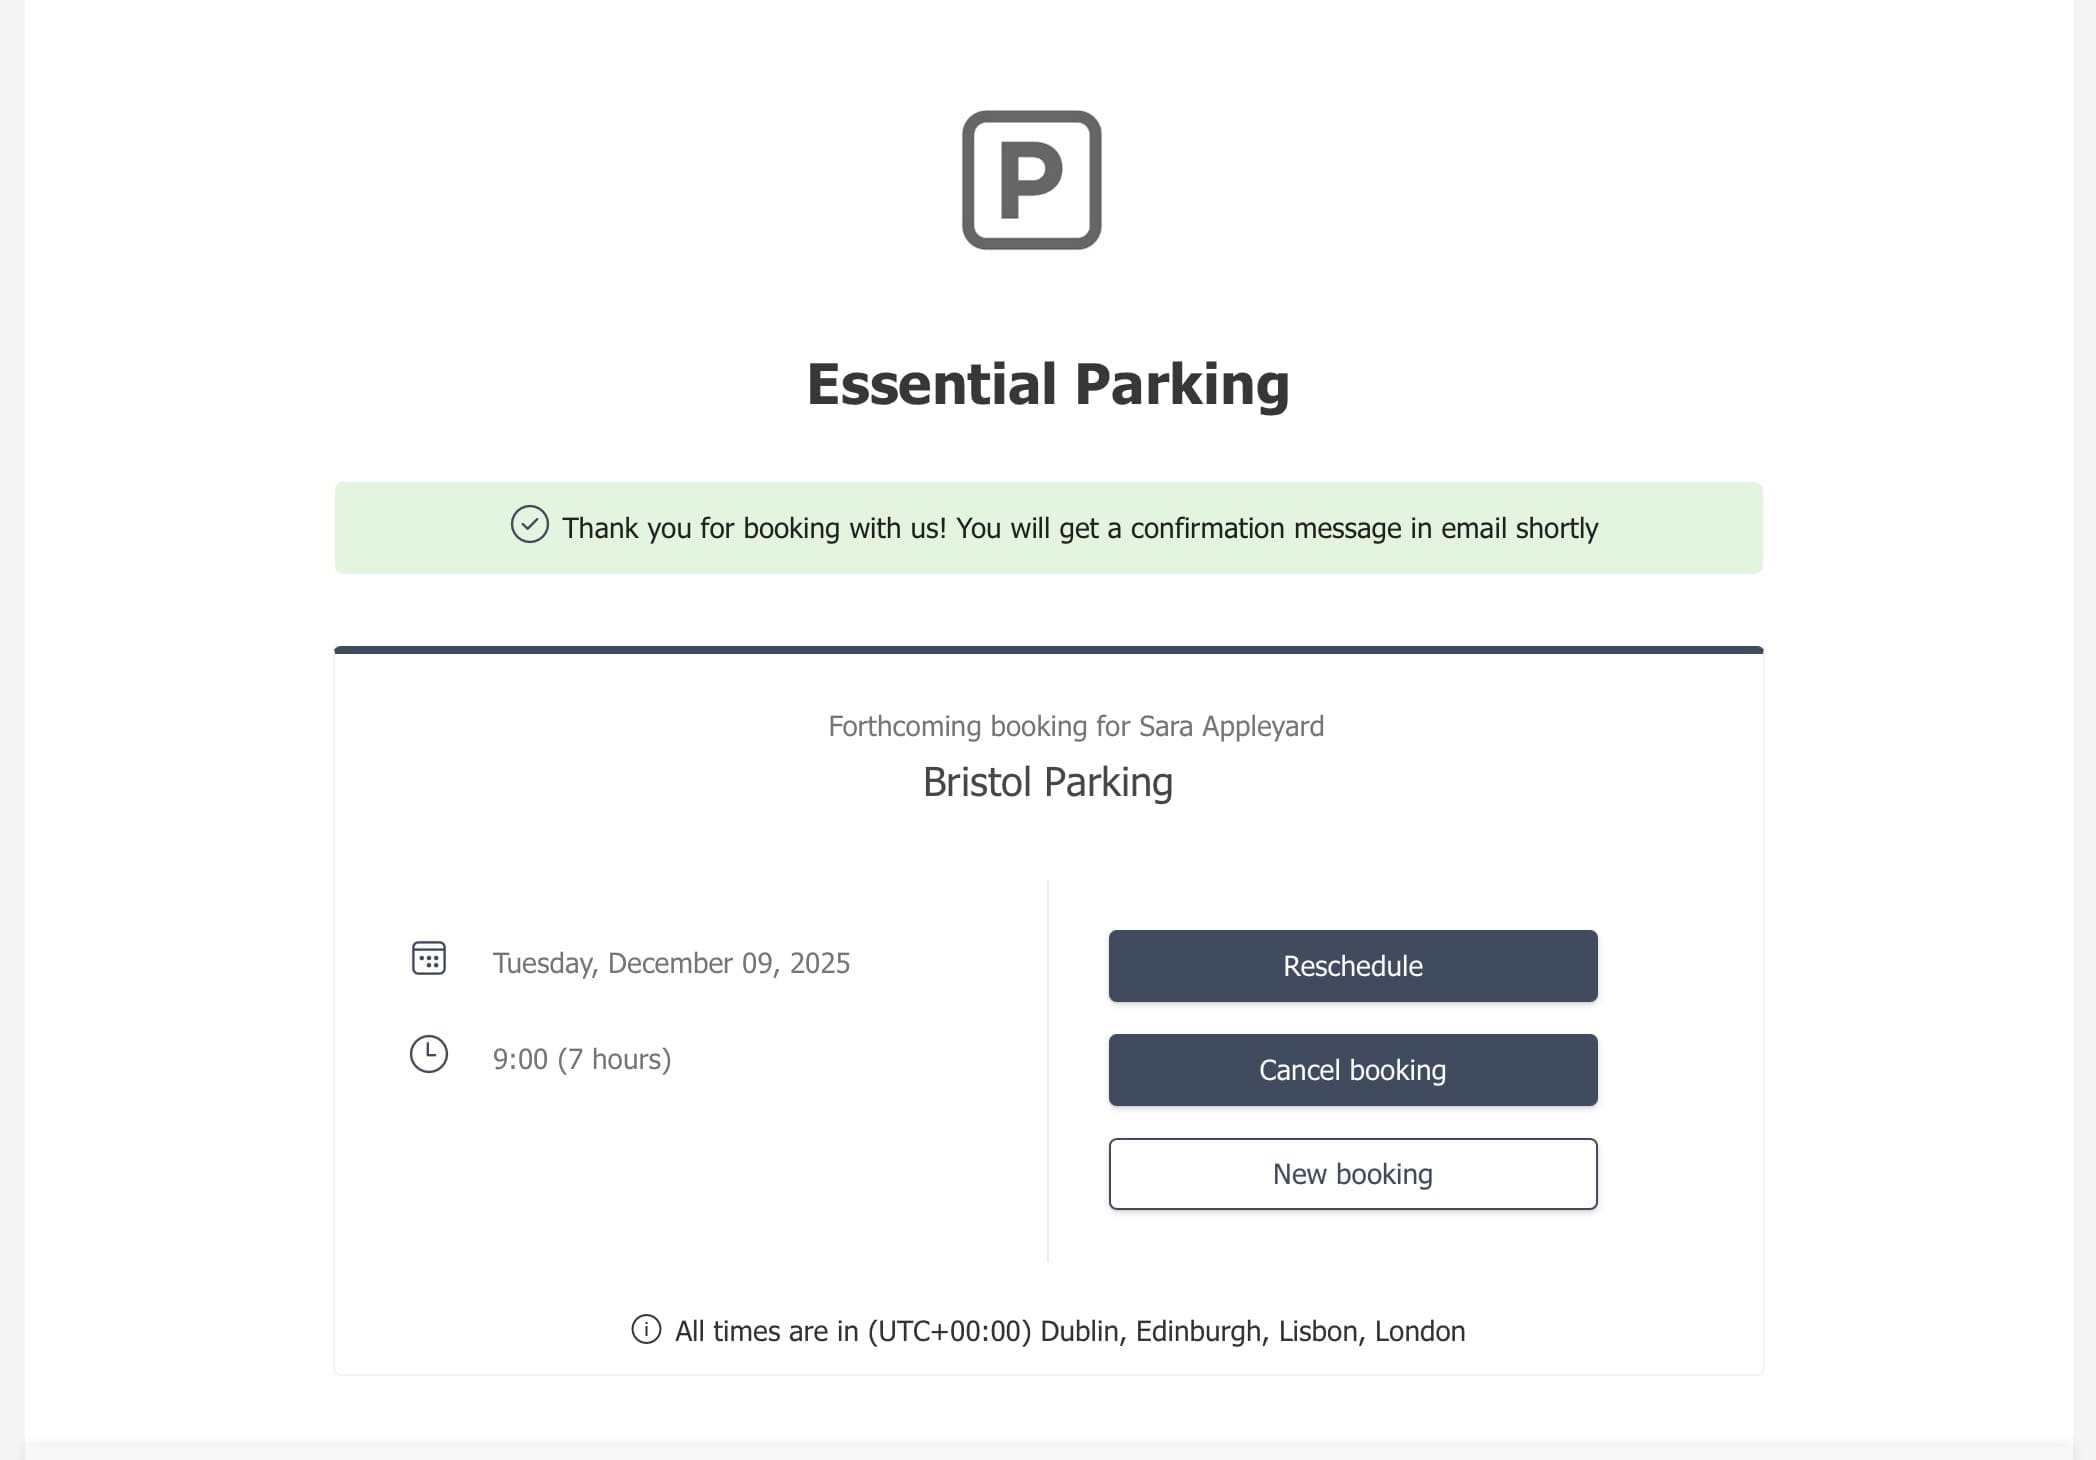
IMPORTANT: Note that simply deleting the booking from your calendar will not delete the booking.
The Admin UX
Those staff responsible for the parking services will get an emailed notification (see below) and a calendar booking.
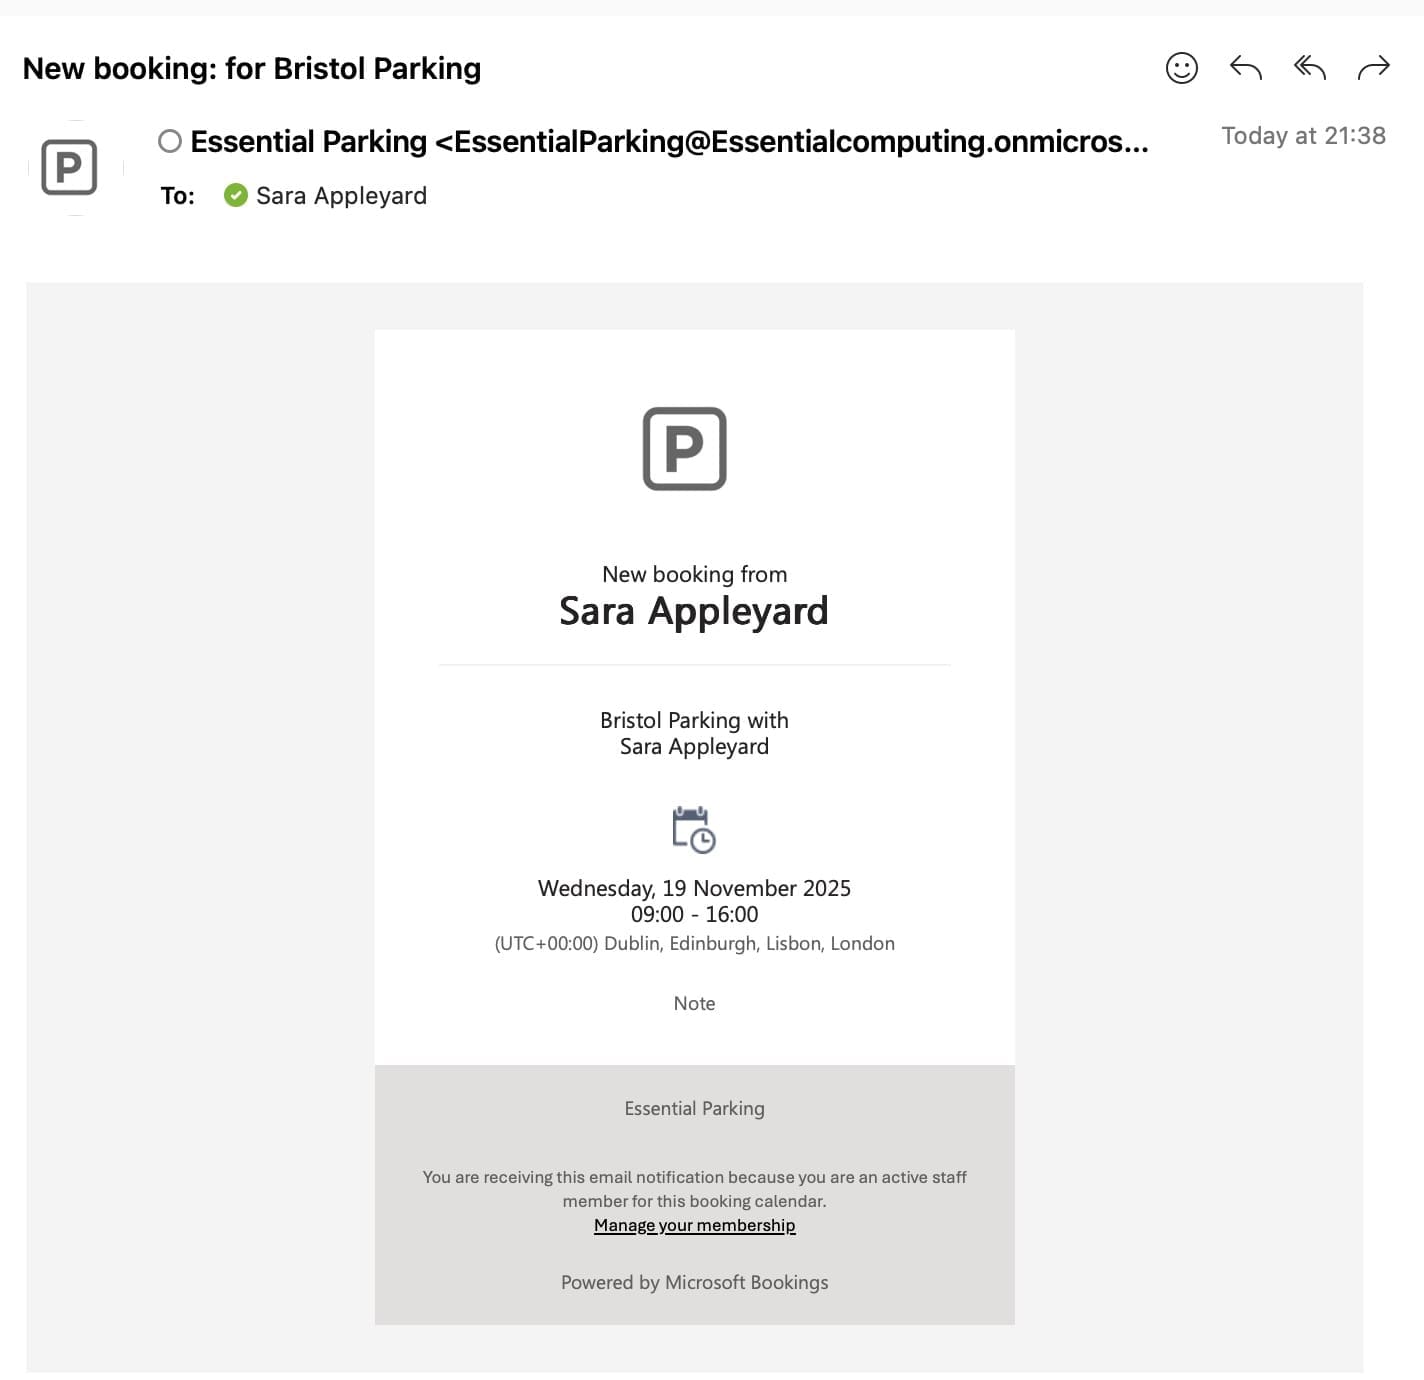
You won’t normally see any bookings in your own Outlook calendar. Bookings go into a separate, hidden mailbox created for the Bookings page. In my example above, EssentialParking@Essentialcomputing.onmicrosoft.com
The Admins of the booking service can access a calendar view of all the bookings, including an indication of what slots have been taken on a daily basis.
As you will see below, 3 out of 20 available parking slots have been taken – watch out as the use of the word ‘seats’ might be somewhat confusing.
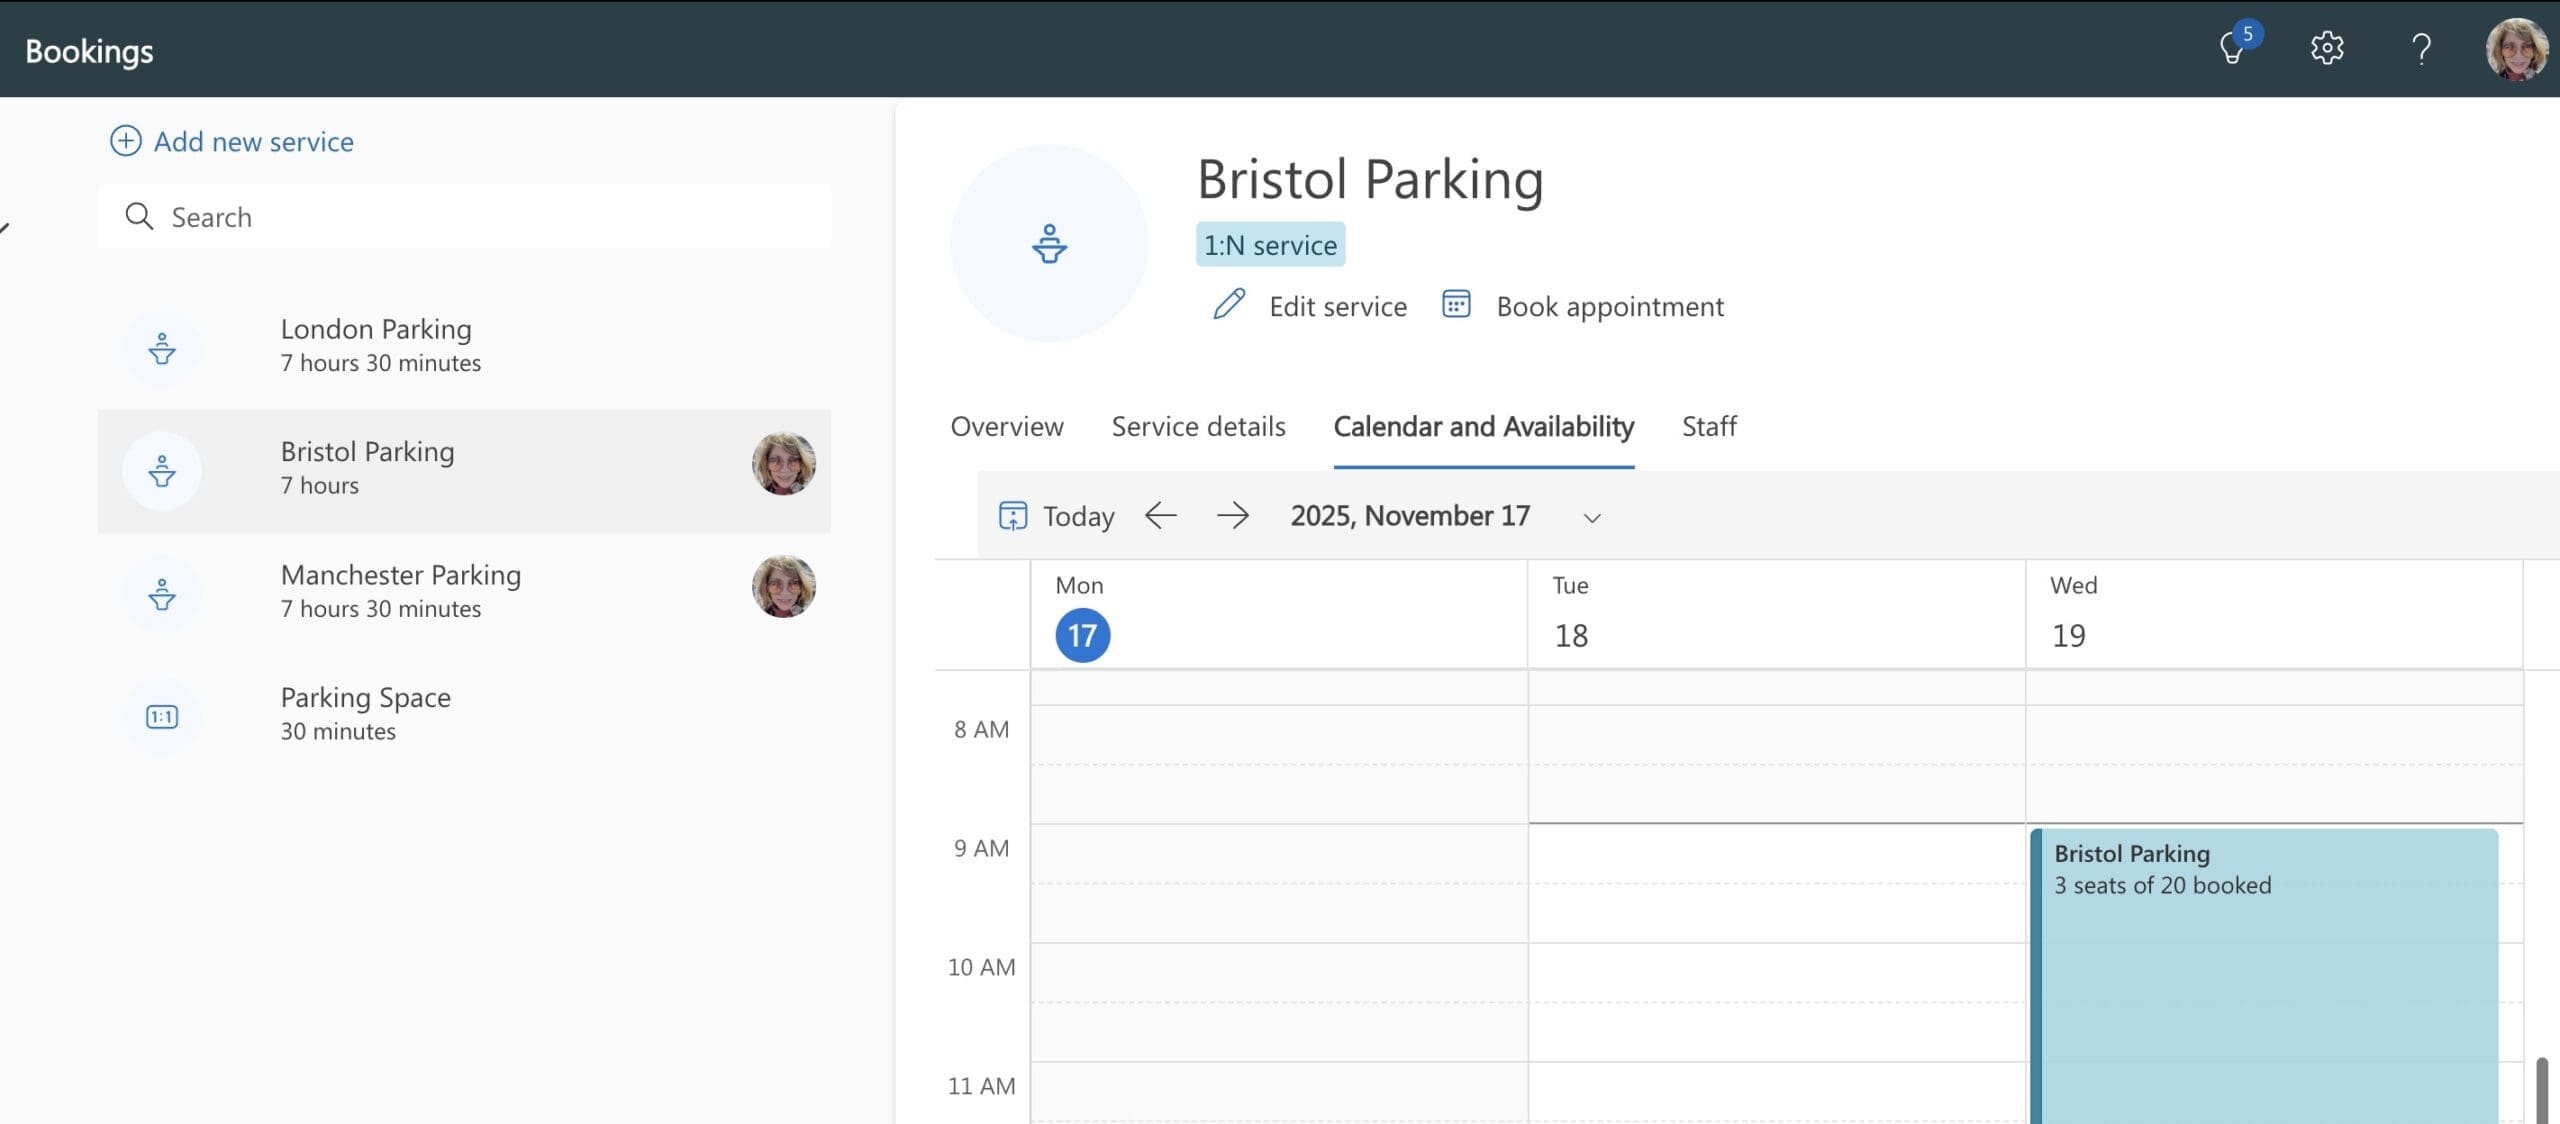
Admins can also book a parking slot on behalf of someone using the ‘Book appointment’ icon seen in the screen shot above.
Conclusion
While Microsoft Bookings can be adapted to manage parking, it’s worth bearing in mind that this isn’t what the tool was originally designed for.
As a consequence, there are a few ‘quirky bits’ you’ll need to accept – for instance, parking spaces are referred to as ‘seats,’ and if you create separate AM, PM, and full-day services, staff that are overseeing parking won’t see all bookings for the day in a single, combined calendar view.
Expect to spend a while testing and refining messages and notifications to get the best user experience.
For example, you might want to configure your Bookings Page further and add branding, colours, terms, or parking policies.
Bear in mind that any changes you make to your service might take a while to publish, so be patient!
There are a few other practical limitations to be aware of:
- Cancellations and rescheduling must be done via the Bookings page. The calendar invitations (either ICS or Outlook/Teams calendar invites) are not fully linked to the booking, so changes (i.e. deletions, rescheduling) cannot be made directly from Outlook/Teams as they would with a standard meeting invite.
- There’s no check-in or arrival tracking. There’s no built-in way to track whether someone actually arrived or used their reserved space.
- No waitlists or prioritisation rules. It’s pretty much a first come, first served scenario – there’s no way to give priority to certain people or change things around.
- No policy enforcement. By this I mean you can’t limit users to a certain number of bookings per month or automatically enforce parking policies without additional workflow tools.
- No integration with physical access systems. For example, Bookings doesn’t tie into ANPR cameras, barriers, or access control.
If you want something more sophisticated and built for the purpose of booking parking, you may be interested in our resource booking solutions that work with Microsoft Places and indeed, regular Outlook calendar bookings.
Supercharge your Microsoft 365 room booking experience!
Unlock the full potential of your native Microsoft 365 room & workspace bookings by incorporating advanced FM services including parking, catering & visitor management.