Microsoft Places
Mastering Microsoft Room Finder
What is Microsoft Room Finder?
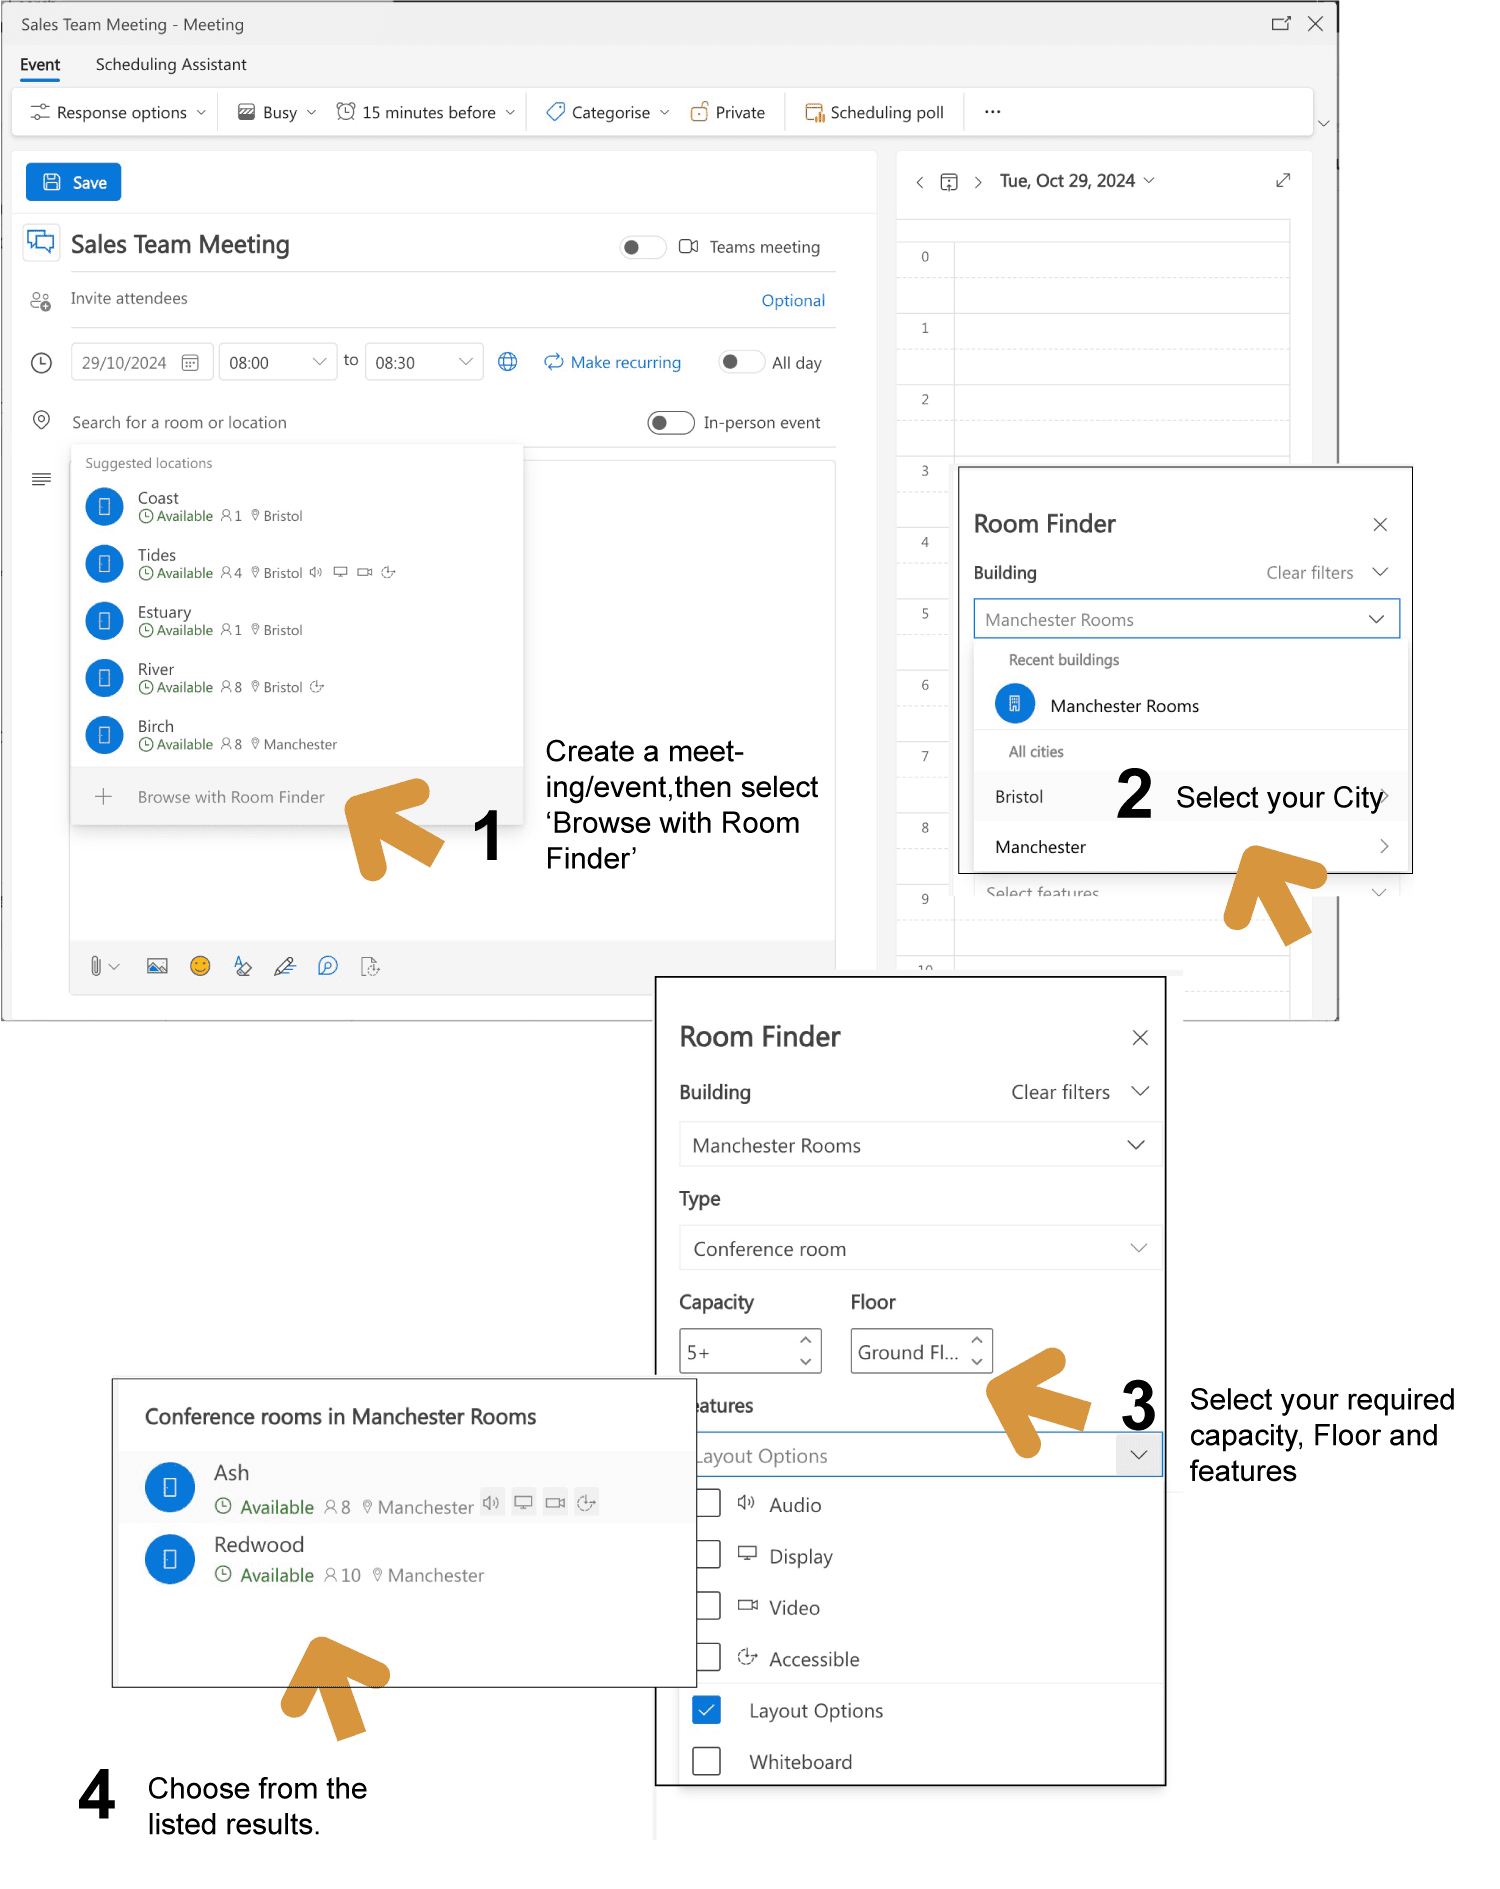
Room Finder is a web-based service that’s available when individuals create a ‘New event’ in Outlook calendar.
In short, if your ‘event’ requires a meeting room or desk, you can use the Room Finder to quickly select and book a suitable meeting room or workspace.
Configured correctly, the Room Finder allows available rooms and workspaces to be navigated according to their physical location (e.g. City, office building, floor) and then further ‘whittled down’ according to their capacity and the facilities they offer.
As such, Room Finder offers a really efficient way to help users select the optimal room or workspace for an office visit.
TL;DR?
The Room Finder in Outlook makes it quick and easy for your workforce to book rooms and desks, but it needs correct configuration.
This article explains how to do it, and how to make it easier for yourself.
Although Teams doesn’t use the same Room Finder, users needing to book a physical space can also benefit (to some extent) if you have done your Room Finder ‘groundwork’.
This article will help you understand how to configure what’s needed ‘behind the scenes’ for Room Finder to work properly in your enterprise.
Getting the configuration right will also give you a great starting point for setting up Microsoft Places, if that’s your chosen destination.
What does Room Finder look like?
Below is an example of what Room Finder looks like in Outlook. It becomes available when you start searching for a suitable room or location at the point you schedule a meeting (event) in Outlook Calendar. You can also get to the Room Finder via the ‘Scheduler Assistant’ in the Outlook Event toolbar.
The Room Finder lets users navigate their ideal workspace according to their physical location (specifically the City and office building it’s in and the floor level it’s on), its capacity, and the properties it offers, including capacity and facilities (e.g. video facilities, wipe board).
Can Room Finder replace a 3rd-party workspace booking tool?
Once you’ve used Room Finder to select a specific location, this will be the default location the next time you use it.
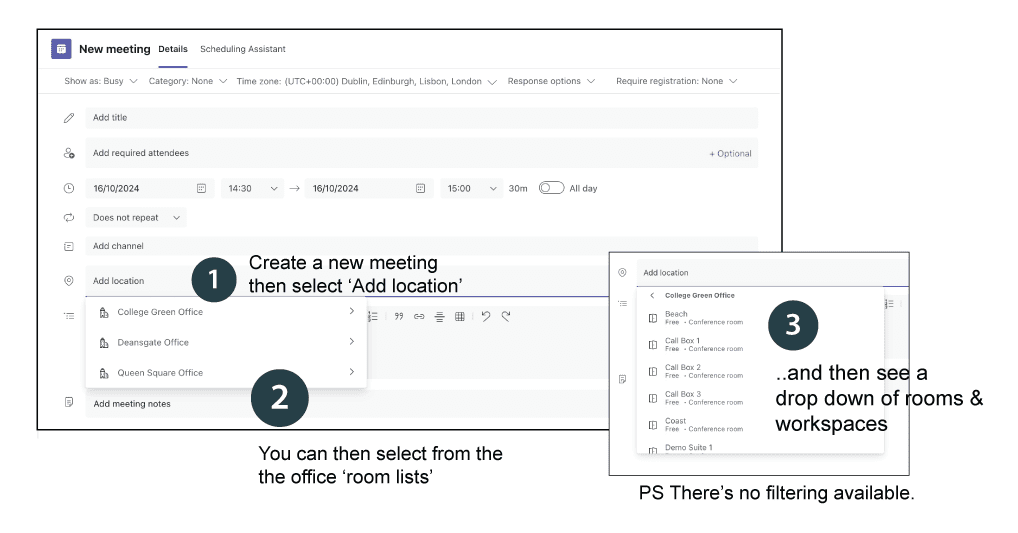
Teams Calendar offers a more limited user experience:
When you create a ‘New meeting’ and click on the ‘Add location’ box, rooms and workspaces can be navigated according to the office locations that have been configured, but not the facilities they offer.
For this reason, you might want to be more descriptive in your workspace names, e.g., Beach Teams Room.
How to Configure the Room Finder
Are you encountering difficulties with the Room Finder in Outlook or the Add Location option in Teams?
Is a big, long list of rooms and workspaces across all locations being displayed at once?
While this might not pose an issue for organisations with a single office, it becomes problematic for larger organisations with multiple locations and a growing list of new workspaces such as small meeting pods and they wish to offer as bookable resources.
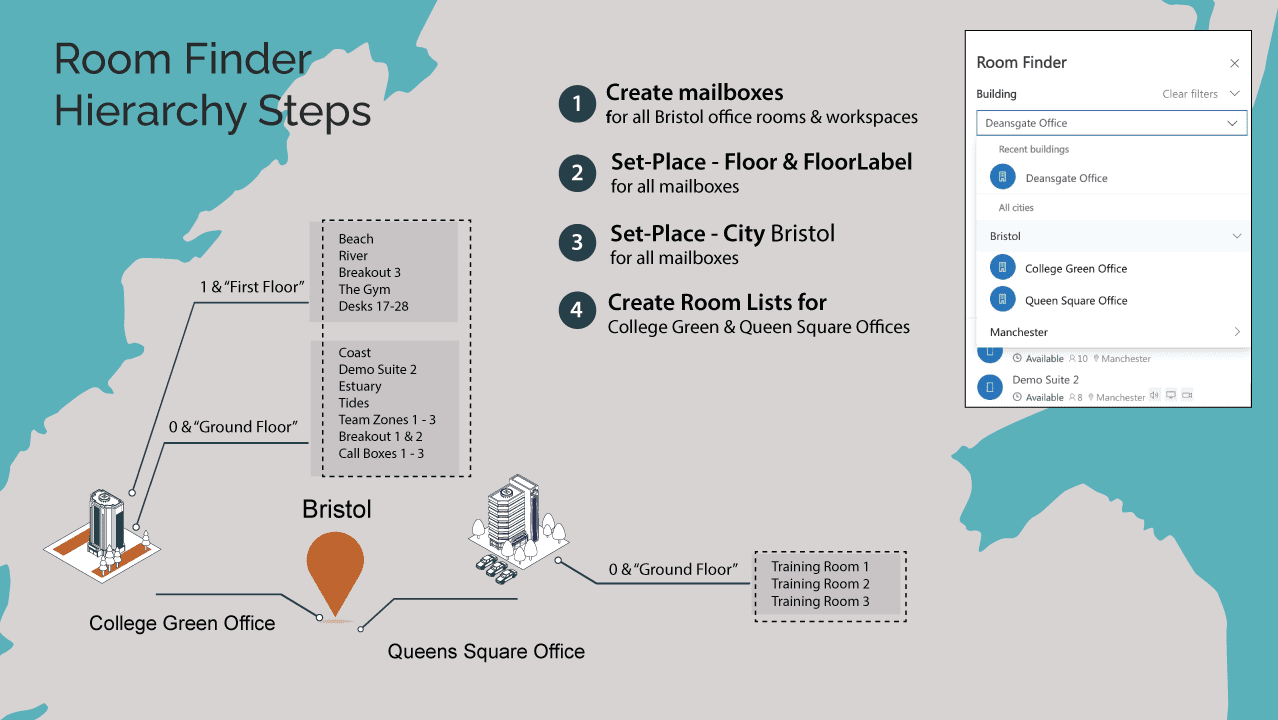
Below is a brief overview of the steps involved in configuring a ‘navigable hierarchy’ for your office locations, offices and rooms and workspaces to work well with the Room Finder facility:
First, Create Your Room Mailboxes
A cornerstone of bookable workspaces is the meeting room mailbox. Meeting room mailboxes provide a solid foundation for managing booking requests and avoiding double-bookings.
If you haven’t already done so, for each room and workspace you will need to create a room resource mailbox in Exchange.
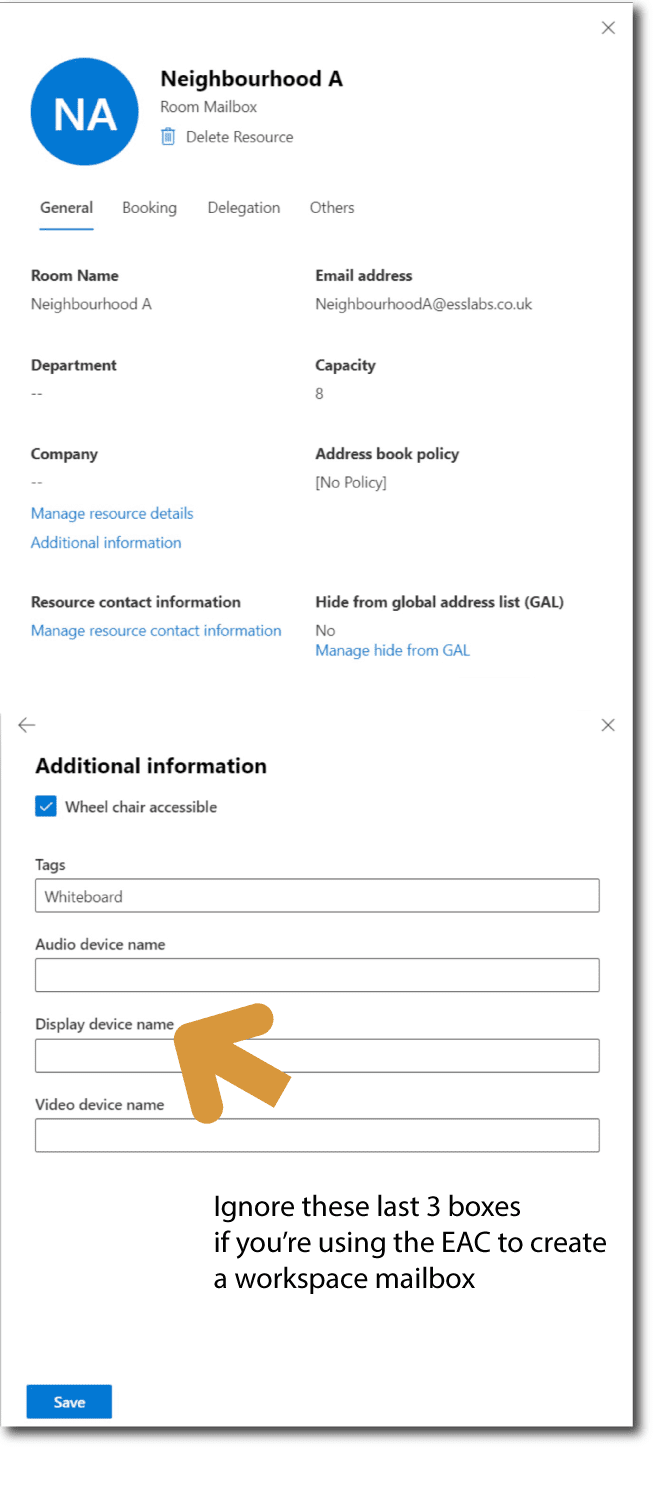
The Exchange Admin Center (EAC) can be used to create room and equipment resource mailboxes using a nice front-end, but it doesn’t let you create a workspace mailbox as such.
Instead, you can create a regular ‘room mailbox’ using the EAC and then use the Set-Mailbox cmdlet in PowerShell to convert it to a ‘Workspace mailbox’.
For example, you can create a room called ‘Neighbourhood A’ in the EAC with a capacity of 8 and a tag to say it has a ‘Whiteboard’, but then you would need to use a PowerShell command to turn it into a Workspace as follows:
Set-Mailbox -Identity “Neighbourhood A” -Type Workspace Workspaces also need other elements configured correctly to work, such as an enforced capacity. You can read more about working with the more recent ‘Workspace’ resource type in our eBook.
Add Properties & Features
The next thing you’ll need to do is ensure that all the relevant properties for your rooms and workspaces are defined. This will help users refine their selections in Room Finder.
The resource properties you can configure using the EAC are:
- City (found in the contact/address properties of the EAC)
- Capacity
- Whether the room (or workspace) is accessible
- The Video, Display and Audio equipment that’s available (only applicable to meeting rooms)
- Tags (these are custom attributes that are handy for calling out resources such as whiteboard, phone charger, sit/stand desk, quiet zone, etc.).
Note that the Video, Display and Audio equipment selection option does not display when using the Room Finder to search for a Workspace, so don’t bother setting them for workspaces – use Tags instead to indicate available equipment.
Another key property to configure is the Floor on which a room or workspace is located within the building, together with a ‘FloorLabel’ that represents the more usual name for the floor.
This information needs to be applied using the Set-Place PowerShell command for each resource mailbox. For example:
Set-Place -Identity "Training Room 1" -Capacity 8 -CountryOrRegion GB -City "Bristol" -Building "Queen Square Office" -Floor 0 -FloorLabel "Ground Floor" -PostalCode "BS1 1AA" -IsWheelChairAccessible $true -Tags “Whiteboard”
Create Room Lists:
Room lists are the ‘glue’ used to associate the relevant rooms and workspaces with the different Buildings (offices) in your office locations (Cities).
So, for example, if you have 2 offices in Bristol, you will need 2 Room lists – one for each office building.
To create a room list you need to set up distribution groups, each of which is given a logical smtp email name, such as QueenSquare@yourcompany.co.uk and CollegeGreen@yourcompany.co.uk
You then need to add all the relevant room and workspace mailboxes as ‘members’ to this distribution group. Again, this is achieved using DistributionGroup PowerShell commands.
Set-Place -Identity "Training Room 1" -Capacity 8 -CountryOrRegion GB -City "Bristol" -Building "Queen Square Office" -Floor 0 -FloorLabel "Ground Floor" -PostalCode "BS1 1AA" -IsWheelChairAccessible $true -Tags “Whiteboard”New-DistributionGroup -Name “Queen Square Office” -PrimarySmtpAddress “QueenSquare@yourcompany.co.uk” -RoomList Add-DistributionGroupMember -Identity "Queen Square Office" -Member "Training Room 1"
Note that although you can create a distribution group of say, “Training Rooms”, that comprises rooms in different Cities, for end users the list will reside under the City that has the majority of training rooms in that list (i.e. it won’t appear for each City).
Add Any Policies & Rules
It is also typical to apply policies to each resource mailbox you configure, such as requiring delegate approval for any bookings of a conference facility, setting thresholds on how far in advance a facility can be booked, setting your working days and hours, and so on.
A very important property when configuring workspaces is to ensure that the capacity you set is enforced. This is done with the following Set-CalendarProcessing command. For example,
Set-CalendarProcessing -Identity “Training Room 1” -AutomateProcessing AutoAccept -DeleteComments $True -AddOrganizerToSubject $True -DeleteSubject $True -RemovePrivateProperty $True -EnforceCapacity $True -AllowConflicts $True -MinimumDurationInMinutes 60
You’ve probably come to this conclusion yourself already, but given you can’t set and/or modify all the required elements using the EAC, you might as well use PowerShell from the outset for everything that needs configuring or maintaining!
TIP: Ditch the EAC – do everything in PowerShell
Why does it take so long to update changes?
Changes you make to room and workspace metadata and lists may take up to 24 hours to reflect in the Room Finder.
Microsoft is working on reducing the delays in updating room and location data, but it’s no surprise it takes a while because background tasks need to synchronise the relevant data across multiple systems, including Exchange Online and Entra ID to ensure metadata updates are reflected across the Microsoft 365 ecosystem.
TIP: A shortcut for making an immediate update to City is to update this field in the EntraID user entry for any given resource.
Conclusion
By setting up your room and workspace resources, lists, and properties correctly, Outlook Calendar users can find their optimal workspace quickly and easily.
And, although Teams Calendar only allows location-based navigation (there’s no attribute filtering) it’s still better than having to sort through a long list of all rooms.
One over-arching observation is that setting up and configuring resource mailboxes in Microsoft 365 is a technically intensive process.
For example, while room mailboxes can be created through the Exchange Admin Center (EAC), converting them into ‘workspace’ mailboxes and setting metadata must be done manually using PowerShell. Likewise, at the time of writing, PowerShell is your only option for creating and working with room lists.
This means that those responsible for managing your office spaces will be dependent on your IT department to carry out simple tasks like adding new resources or adjusting capacities and features. This can lead to delays and frustration, especially as the need for more flexible and dynamic workspaces and demand-led space management grows.
What about Microsoft Places?
Compared with Room Finder, the Microsoft Places Finder delivers a much nice UX, with the ability to include photos of the various rooms and workspaces you have to offer. There’s also the option of a map view for ‘same day’ bookings (i.e. you can’t us the interactive map for future bookings as yet).
As Microsoft Places is only recently out of public preview, it may take some time before it becomes a fully viable option for your company and there’s a few ‘gotchas’ as yet which you may wish to track along with our Places team.
In the meantime, focusing on setting up everything needed for Room Finder will give you a significant head start with Microsoft Places.
For example, there’s a tool available from Microsoft to give you a quick start configuring Microsoft Places is ‘Initialize-Places’. Initialize Places looks at all the mailboxes, room lists, and location metadata you’ve already configured for Room Finder to establish your Places architecture.
You can read more about configuring your buildings and floors for Microsoft Places here.
In short, by setting up your environment now, you’ll be well-positioned to take advantage of Places’ advanced capabilities when it’s ready.
Want an easy way to configure and maintain Room Finder?
Are you finding the configuration and maintenance mailboxes, lists, attributes, etc. a pain?
Ask about our free utility makes it easy for your FM team to manage their resources, whilst maintaining IT governance.


