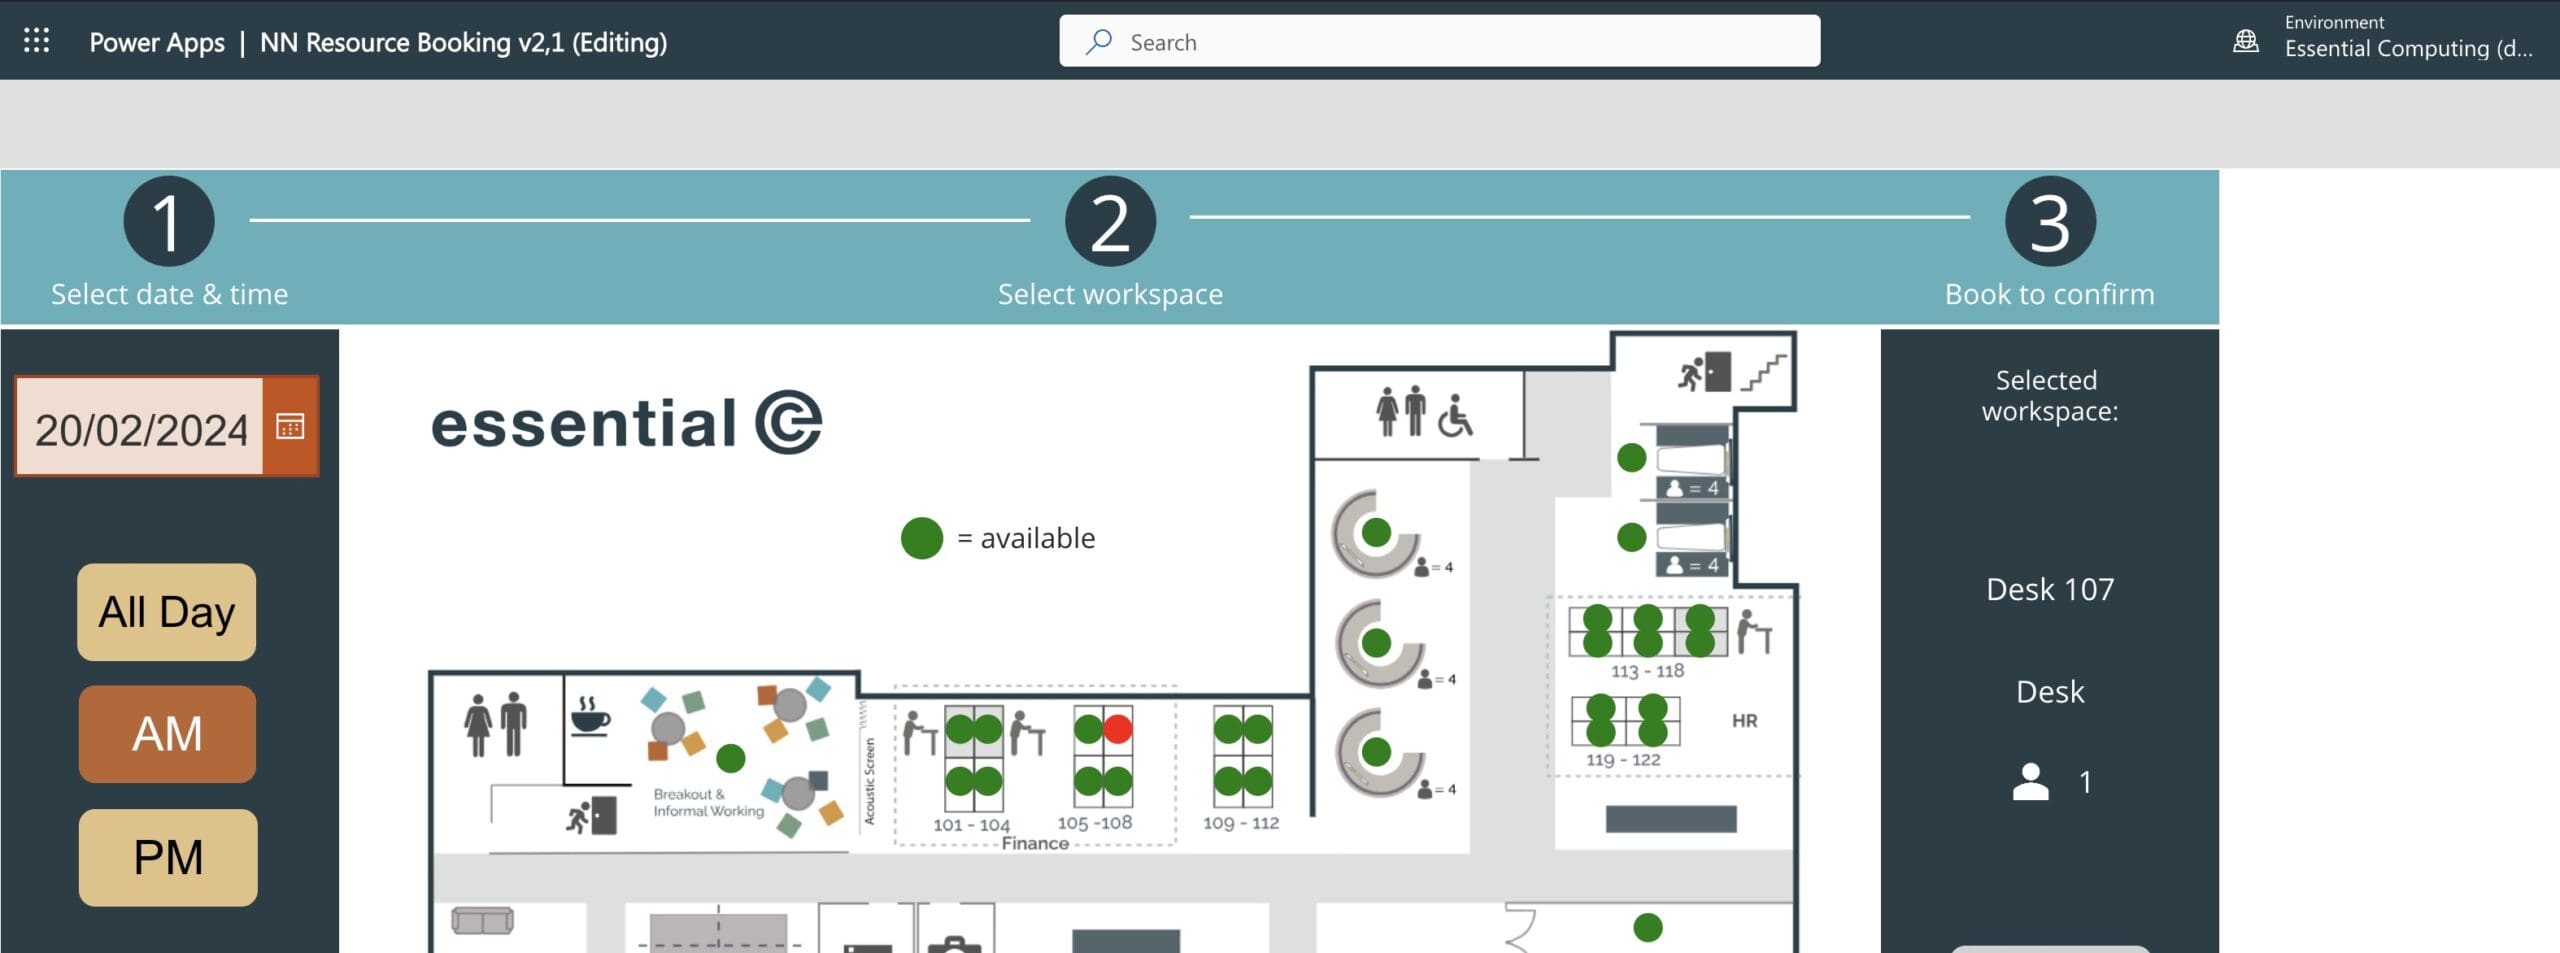
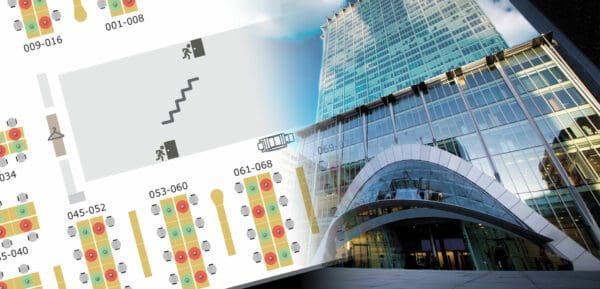
We help Microsoft-centric enterprises fully adopt the cloud & adapt to new ways of working.
Essential Solutions :
Get essential updates instantly! Subscribe
Essential Power App Desk Booking System

Desk booking

How to configure an interactive workspace booking system using Microsoft Power Apps

You’ve probably seen examples of room booking systems that use Power Apps to allow selection of available workspaces from a list.

For example, you can find one here. Click ‘Create’, and scroll to the Book A Room ‘Canvas template’.

TL;DR?

Apologies – this IS a long article!

The fact is, creating your own workspace booking system IS possible using PowerApps, but be prepared to do a lot of work to get something that meets everyone’s needs.

In this article we wanted to explain how to use Power Apps to book desks and meeting rooms via a floor plan with interactive ‘hotspots’ that in turn link to Microsoft resource mailboxes.

Here’s what we’ll cover.

  • Overall design and functionality
  • How to create an interactive floor plan view that allows bookings in Power Apps
  • All the other bits and bobs that setting this up entails!
  • Additional functionality considerations

Overall design of your workspace booking system using PowerApps

The Power App UX design and workflow for a workspace booking system is endlessly variable.

In our example we created a one-screen, 3-step design that guides individuals through the process of:

  1. Selecting the date and time they want to come into the office,
  2. Showing workspace availability on an interactive floor plan using red/green hotspots, and
  3. Allowing them to select and confirm the workspace they wish to book.

The fact is, you can design it to look and work however you want.

I’m therefore NOT going to attempt to go into the specific coding behind the flow, buttons, and input fields, as this part is easily researched online.

It’s also subject to how you want your application to look.

Instead, we are going to discuss some of the trickier aspects of creating an interactive floor plan from which end users can book workspaces, starting with how to get the hotspots working.

Buckle in, we’re going to go into some detail!

How to create hotspots on an interactive floor plan in Power Apps

The interactive floor plan is based on a combination of an ‘underlying’ floor plan image with an ‘overlying’ Gallery control which governs the hot spots.  You can read more about Gallery control in Power Apps here.

Each bookable workspace on the floor plan corresponds to a record in the Gallery (in our example we used a circle shape). 

This is how we set everything up:

  1. Gather the x,y coordinates for each bookable workspace on our floor plan
  2. Store these coordinates in a SharePoint list
  3. Position our gallery of ‘hot spots’ (circles) according to these coordinates
  4. Fine tune your hotspot positions
  5. Colour each hotspot according to free/busy status
  6. Allow users to select an available workspace
  7. Use the selection to book the relevant workspace in Outlook.

1. Gather workspace coordinates

First place your floor plan graphic file onto the PowerApp screen, bearing in mind any screen content you may want around your floor plan. For example:

Note, for tips on how to design your floor plan for the optimal user experience, check out this article.

You have the flexibility to adjust its size and position according to your needs, but it’s advisable to ‘lock in’ the position before proceeding to the next step of gathering the x and y coordinates for each workspace and placing them on your floor plan.

To do this:

  • Add a shape into the app and size it relative to the floorplan, for example here is a circle I added:
  • Now, move the shape onto the first workspace and note the x and y coordinates.
  • Record these co-ordinates into an Excel spreadsheet.

Repeat this for each workspace until you have collected all the x and y coordinates.

2. Write your workspace coordinates into a SharePoint List

  • Create a SharePoint list to store the coordinates
  • Upload your x & Y coordinates from your Excel spreadsheet
  • Use a column that will have a unique reference for each workspace. As our app is integrated with resource mailboxes, we are using the resource mailbox email address as the reference.

    For example:

In our example we used meeting room resource mailboxes for the meeting rooms, and a workspace resource mailbox with a capacity of 1 for the desks.

You can read more about how to create resource mailboxes, including the more recent workspace resource in this separate eBook.

IMPORTANT: As we will be using this SharePoint List as a data source in the Power App, every user that will use the app requires read rights to this list in SharePoint.

3. Position a gallery of ‘hot spots’ (circles) according to your coordinates

  • In your app, add a Blank Vertical Gallery and connect it to the coordinates list created in the step above
  • Size and position the gallery so that it exactly overlays the floor plan image
  • Set the following properties of the gallery to 0:
    • TemplateSize
    • TemplatePadding
    • WrapCount
  • Next, insert a shape or icon that will be used as a hotspot on the workspace. We are using a circle. You won’t see much yet as we have not pulled in the x and y coordinates:
  • Select the shape that you have added into your gallery
  • Set the x to be ThisItem.x and y to be ThisItem.y. See right>
  • Set the size of the shape, in our example we used width 20 and height 20.
  • Now, you should see your hotspots roughly over the workspaces you have configured.

    For example:

Next, we’re going to line up the hot spots.  Warning: This can take a bit of effort.

4. Fine tune your hotspot positions

You may notice that the circles don’t quite line up in the first pass, despite the coordinates being correct.

This is because the gallery doesn’t quite handle the y coordinate in the way that we want.  Bother!

It actually increments the offset for each record by 1. So over time, the hotspots become increasingly out of line. This calls for a slight adjustment to the y value.

One way to handle this is to load the list of workspaces into a string variable in the app and then to use a formula which removes the increment based on the entry’s position in the string.

To do this, add this code to the OnVisible property of your screen:

Set(AllWorkspaces, Concat(FloorplanCoords, Title & ";"));

This will populate the string AllWorkspaces with the names of the workspaces separated by a semi-colon. We will see later that this string is also used to collect the resource availability from Exchange.

Change the ‘y value’ for the circle to use this formula:

ThisItem.y-(CountRows(Split(First(Split(AllWorkspaces,ThisItem.Title)).Value,";"))-1)

This should bring your hotspots into line.

If not, your hotspots might benefit from a little shift to the right, so a small change to the x coordinate will do that.

TIP: You may have to Save, leave the App and open it again for the OnVisible code to take effect.

Additional TIP: If you did not place your floor plan image and gallery to fill the screen or any position other than top left, you may see your hotspots in the wrong position. To fix this you will need to adjust the x and y of the circle based on the position of your gallery.

In my case my gallery position is like this>

So I had subtract these x and y values in the circle formulas, like this:

And my hotspots about lined up – Phew!

Other things you’ll need to configure

Getting the hot-spots lined up is a bit of a pain, but that’s the hard bit out of the way.

In this next section we’ll look at the other components you’ll need to configure in the application in order to get your interactive floor plan to work.

Fancy a mental break?

Check out our video which shows our demo Power Apps desk booking system.

Colour each hotspot according to free/busy status

So far, we have kept all the hotspots as their default colour. In our app we used the colour of the hotspot to indicate whether the resource is available or already booked: Green = available, Red = busy

This requires that we lookup the free/busy status of the related mailboxes for the date/time chosen by the user of the workspace booking system:

Connect to Exchange

The connection to Exchange will be managed with the “Office365Outlook” data source.

Add this to your app using ‘Add data’.

Prompt the end user to select the date and times they want to book.

In our app we used a date picker and some AM/PM/All day buttons.

For our example, we assumed that the booking will be or an all-day booking for today. So, we created some variables to hold this information as follows:

Set(StartTime,"08:30");
Set(EndTime,"17:30");
Set(DateSelected, Today());

We also needed to create some extra variables for the function call to Exchange:

Set(StartDateTime, DateSelected&" "&StartTime);
Set(EndDateTime, DateSelected&" "&EndTime);
Set(StartDateTimeUTC, Text(DateAdd(StartDateTime, TimeZoneOffset(), TimeUnit.Minutes), "[$-en-US]yyyy-mm-ddThh:mm") & ":00.000Z");
Set(EndDateTimeUTC, Text(DateAdd(EndDateTime, TimeZoneOffset(), TimeUnit.Minutes), "[$-en-US]yyyy-mm-ddThh:mm") & ":00.000Z");

Use the “FindMeetingTimes” function to determine free/busy status

We passed this function the list of resource email addresses, along with our required date and times. The function returns a table with the results, and we can store this in a collection:

ClearCollect(ResourceAvailability, Office365Outlook.FindMeetingTimes({RequiredAttendees: AllWorkspaces, IsOrganizerOptional: true, 
        Start: StartDateTimeUTC, End: EndDateTimeUTC, MeetingDuration: DateDiff(StartDateTime, EndDateTime, TimeUnit.Minutes),
        MinimumAttendeePercentage: "1", ActivityDomain: "Unrestricted"}));

The table returned contains nested tables and records and we can make this much easier to work with by creating a new table which has just two columns:

  • one for the workspace email address and
  • the other for the workspace availability
ClearCollect(WorkspaceStatus,ForAll(First(First(ResourceAvailability).MeetingTimeSuggestions).AttendeeAvailability,{Email:Attendee.EmailAddress.Address,Status:Availability}));

This is how the final table looks in our example:

This is the entire code we have for our map screen under its “OnVisible” property:

Set(AllWorkspaces, Concat(FloorplanCoords, Title & ";"));

Set(StartTime,"08:30");
Set(EndTime,"17:30");
Set(DateSelected, Today());
Set(StartDateTime, DateSelected&" "&StartTime);
Set(EndDateTime, DateSelected&" "&EndTime);
Set(StartDateTimeUTC, Text(DateAdd(StartDateTime, TimeZoneOffset(), TimeUnit.Minutes), "[$-en-US]yyyy-mm-ddThh:mm") & ":00.000Z");
Set(EndDateTimeUTC, Text(DateAdd(EndDateTime, TimeZoneOffset(), TimeUnit.Minutes), "[$-en-US]yyyy-mm-ddThh:mm") & ":00.000Z");

ClearCollect(ResourceAvailability, Office365Outlook.FindMeetingTimes({RequiredAttendees: AllWorkspaces, IsOrganizerOptional: true, 
        Start: StartDateTimeUTC, End: EndDateTimeUTC, MeetingDuration: DateDiff(StartDateTime, EndDateTime, TimeUnit.Minutes),
        MinimumAttendeePercentage: "1", ActivityDomain: "Unrestricted"}));

ClearCollect(WorkspaceStatus,ForAll(First(First(ResourceAvailability).MeetingTimeSuggestions).AttendeeAvailability,{Email:Attendee.EmailAddress.Address,Status:Availability}));

Check free/busy status to colour the relevant hotspots.

Expand the gallery element of your map screen and select the shape that you are using for the hotspots, for example, see right>

Select the “Fill” property and set a formula that looks up the availability status and sets a relevant colour.

We used the default red and green, but you can customise the colours to suit your design:

Here is the formula for you to copy:

If(LookUp(WorkspaceStatus,ThisItem.Title=Email,Status)="Free",Color.Green,Color.Red)

Our hotspots now show the availability for the selected times:

Allow users to select an available workspace

To facilitate the display of the selected workspace and to set the location when we they make a booking, add an extra column to your SharePoint list for the workspace name. For example:

First add a new variable that will be set to the selected workspace name when a hotspot is clicked. Add this to your map screen OnVisible code:

Set(SelectedWorkspace,"");

Select the hotspot shape in the gallery again and we’ll add some code to the OnSelect property:

Set(SelectedWorkspace,ThisItem.Title);

Display the selected workspace

Add a Text Label to your screen and set the Text property to lookup the name of the workspace. Initially, this will be blank. For example:

The formula is as follows:

LookUp(FloorplanCoords,Title=SelectedWorkspace,Name)

Now if you play your app, the name of the workspace will be shown when you click a hotspot.

Book the relevant workspace in Outlook.

The final step is to send a booking request to Outlook for the selected workspace.

You could book the workspace at the same time as clicking on a hotspot, but let’s make the code more sophisticated and add a Book button. To do this:

  • Add a button underneath the text label
  • Set the Text property of the button to ‘Book’
  • Set the Visible property to the following formula, which will make the button visible when a hotspot is selected, and the corresponding workspace is also available:
LookUp(WorkspaceStatus,SelectedWorkspace=Email,Status)="Free"

To make a booking we will utilise the Office365Outlook connection again.

We need to set some variables up front, which can be added to the App OnStart property. These will capture the details for the current user and the Calendar folder of their mailbox.

Add the “Office 365 Users” data connection to your app. Then add the following code to the App OnStart property:

Set(MyCalendar, LookUp(Office365Outlook.CalendarGetTables().value, DisplayName = "Calendar").Name);
Set(MyName, Office365Users.MyProfile());

Note: if you have multi-language mailboxes, you will need to cater for different names for “Calendar” folder. See the out-of-the-box ‘Book a Room’ app for how this can be done.

We’ll add the booking code to the OnSelect property of the Book button:

Office365Outlook.V2CalendarPostItem(MyCalendar, User().FullName & "'s Booking", StartDateTimeUTC, EndDateTimeUTC, 
        {RequiredAttendees:SelectedWorkspace, Location: LookUp(FloorplanCoords,Title=SelectedWorkspace).Name, Importance: "Normal", ShowAs: "Busy"});

Now we have a functioning app. Hurrah!

Select a hotspot and the name of the workspace is shown with the Book button:

Click the book button to make a booking.

The resource mailbox will accept or decline the request based on its calendar policy.

As with regular resource mailbox bookings in Outlook calendar, this will also create an appointment in the user’s calendar and send a meeting request to the resource mailbox.

Additional Functionality Considerations

We hope this article has helped you navigate your way around some of the stickier bits of developing a floor-plan-based, interactive workspace booking system using Power Apps.

As mentioned earlier in this article, there are many ways you can build your app and enhance it to ensure it caters for the very wide range of scenarios encountered when delivering an enterprise desk booking systems.

Here are some extra checks and balances we incorporated into ours:

  • Workspace attributes:
    • Workspace names: Meeting room, collaboration pod, quiet desk, etc.
    • Capacity (relevant for rooms and other spaces)
    • Desk attributes, such as riser desk, 2 screens, accessible
  • Labels, labels, labels. For example:
    • A ‘Booked’ message that appears after booking
    • A label that shows ‘Unavailable’ if a red hotspot is selected
    • Links to help
  • Timers that refresh hotspot status/colours, for example:
    • Immediately refresh the hotspot colours after booking
    • Periodically update hotspots (to reflect any bookings made whilst the user is ‘deciding’)
    • Automatically ‘unselect’ a workspace if the user does not proceed to make a booking within a specified time-window.

To deliver a fully-formed workspace booking system for anything other than a small team, or one small office, you might also need:

  • Filters to only show workspaces of a specific type or with certain attributes
  • Multi-level, multi-location navigation across floor plans
  • Support for additional resource requests, such as seating layouts or catering for meeting rooms
  • Indicators of where colleagues are already booked to visit the office
  • Policies that govern what workspaces can be booked based on factors like department, accessibility needs, cut-off times, etc.
  • The ability for FMs to manage what’s been booked, and perhaps move bookings around
  • Reporting and analytics on what’s been booked.

The list goes on. And on.

Discover workspace booking systems that build on your Microsoft 365 investment.