Want to upload a bespoke festive Teams background? Here’s how:
Visit a site that you already use for licenced imagery, or a site you trust for free images.
Search using terms like ‘Christmas living room’ to get a homely festive backdrop, or you might want a festive office vibe!
Look for an image that has a reasonable gap in the middle (for your head)!
Download it.
Resize and/or crop it to around 1920 x 1080 pixels.
Next, this is the weird thing you need to do to ‘check out’ and apply your festive Teams background:
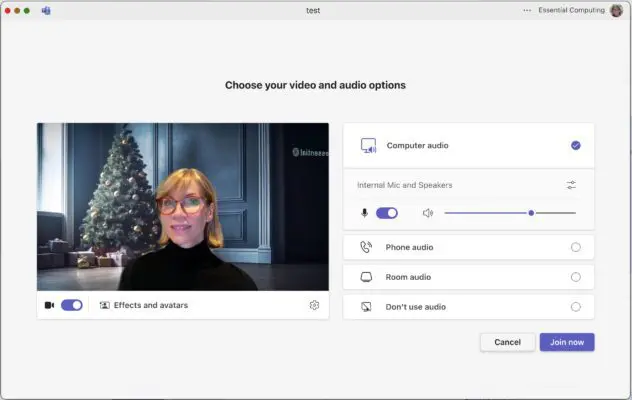
Did you know that you can’t actually apply a Teams background without being in a Teams video call?!
When you’re just testing your new Xmas background, this isn’t always convenient. You can either ‘Teams a friend’ or, use this weird ‘hack’ to test-drive and apply your Teams backdrop and ‘Teams yourself’. This is how to do it:
Invite yourself to a Teams meeting to start immediately & join the Teams meeting
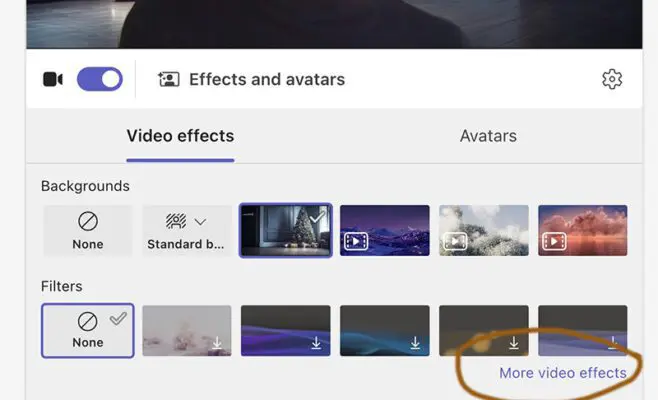
Click ‘Effects and avatars’ followed by ‘More video effects’
Select ‘Add new’
Upload what you created earlier (you may need to scroll to select it once uploaded).
Your new, festive Teams background will appear on the preview screen and be there for your next real call!
Did you want to add a company logo to your Teams background?
We put the icing on the cake by adding our company logo to our festive backdrops.
If you want to do the same, ideally add a vector version of your logo into your graphics package (or a high resolution transparent png) to your image, putting it in a location that makes sense. E.g., 3/4 the way up, on either the left or right of the image (otherwise your head will be in the way).
You could also put your logo on a ‘plaque on the wall’ to add that touch of realism!
Does your Teams background look back to front?
If you added a logo to your festive backdrop, don’t worry that it looks back-to-front (flipped) in your Teams preview screen.
This is because, by default, you see the mirrored view of yourself in a Teams call. Don’t panic – it’ll be OK (and appear the right way round) when you’re on a festive call!
Can you share and apply Teams Backgrounds enterprise wide?
If you have the Microsoft Teams Premium license then yes – you can upload a festive background and any other corporate backgrounds you want to use for your company centrally.*
But at £5.80 per person per month for Teams Premium, you’d probably need more functionality than just personalised backgrounds to make it worthwhile.
*You can also share your festive images by posting them in a SharePoint document library and having folk access them via OneDrive
Get more out of Microsoft Teams
Discover how you can drive onboarding, compliance and professional development within Microsoft Teams
In this blog we will look at how you can use SharePoint Lists to allow individuals to answer a series of quiz questions over a series of days.
The starting point was that our marketing manager wanted to create a daily fun and seasonal quiz question to go alongside our SharePoint advent calendar.
Each day, she wanted to post a new quiz question on SharePoint, and at the end of the quiz period, she would need a way to collate and mark all the entries to select a winner.
The other driver behind this approach was to make visiting our intranet a daily habit.
My first thought was that using Microsoft Forms would be a good approach, but this did not suit the ‘daily habit’ she wanted, as we would have needed a form per day.
As with many things in SharePoint, there may be more than one way of doing this with varying degrees of work involved.
In the end we used a SharePoint List, and this is how we did it, step by step:
Create a virtual advent calendar for your team In Modern SharePoint
Then, we added a column for the answer, with the name ‘Enter your answer here’ as follows:
+Add Column>Text>Next
Name= ’Enter your answer here’,
Type=’Single Line of text’
Save
The above example is for a single line of text, but you could make all your questions multiple choice. In this case you should ideally establish a fixed number of options (e.g, A, B, C & D).
The ability to upload an attachment to the list is on by default so we turned off the option to upload attachments. To do this:
From the list view, click on the ‘Cog’ link on the top right of your screen
Select ‘List Settings’, followed by ‘Advanced Settings’.
In the Attachments section select ‘Attachments to the list are: Disabled’.
2. Set the SharePoint list so users can only add and see their own answers.
This stage involves two steps:
Enabling respondents to edit the list. You’ll no doubt find that a list on say, your marketing site, has a default setting of read only. You will need to set an individual permission on your list. To do this:
From the list view, click on the cog on the top right and select ‘List settings’.
Under ‘Permissions and Management’ select ‘Permissions for this list’
Click ‘Stop Inheriting Permissions’, then
Grant permission levels for the relevant group for your company (or those you want to participate in the quiz) to ‘Contribute’.
Make sure you uncheck the ‘Notify’ box so as not to spam everyone!
Making sure respondents can only see and edit their own list entries. To do this:
From the list view, click on the ‘Cog’ link on the top right of your screen
Select ‘List Settings’, followed by ‘Advanced Settings’.
Under ‘Item Level Permissions’, select the following radio buttons:
Read access: Read items that were created by the user
Create and Edit access: Create items and edit items that were created by the user
After these two steps, members of the group you specified will only be able to see and edit their own entries.
Meanwhile only the List Administrator (in this case, our marketing manager) will be able to see and export all entries for marking.
NB This same approach to setting permissions on SharePoint Lists can be handy for things like recording holidays and sick leave in SharePoint.
3. Get the best user experience for your SharePoint List
Ever mindful of getting the best ‘end user’ experience, we wanted to make sure that folk not used to working with Lists in SharePoint didn’t struggle:
Arguably, adding an item to a SharePoint list is not intuitive.
Although you can embed a list as a web part in a page and add ‘instructions’, the default action when you embed a list is that a new tab is opened when you click on +New. This may be confusing to end users.
My ‘hacks’ to make SharePoint Lists more user friendly are as follows:
Link directly to the list view. By doing this, the data entry panel that pops up when you press +New is kept in same view.
Given that a ‘list view’ does not allow extra information to be added, you can use the name you give the list to provide a bit of user guidance! Here I used ‘Press +New (above) to add an answer’ as the list name.
If you have any other ‘hacks’ to make SharePoint a bit more user friendly like this I’d be keen to know!
4. Create and post your Christmas Quiz Questions
The questions you use and how you post them is up to you.
We will be posting our questions as daily news items in SharePoint, each with a link to the list and each with a little reminder about the entry rules and how to post answers.
You can take advantage of news scheduling to set all your questions up in advance and know they’ll go out automatically.
You could of course have a dedicated quiz page and update it with each new question daily – perhaps you could have an advent image for each day and link your question with that.
You might also want to set up a workflow to put notifications about each new question into your ‘social’ or other relevant Team.
5. Mark Your Quiz Responses
At the end of the quiz, you can simply go to your List page and export all the entries to your quiz as a CSV file for marking. Note that the name of the respondent is automatically shown in the ‘Created By‘ field.
We’ll leave the marking bit up to you, but if you are handy with Excel manipulations you won’t find it a problem!
Find out more about our SharePoint Services
We offer a range of services to help you get the most out of SharePoint Online, including storage management, guest access management and design services.
Using unlicensed or non-on brand imagery on your SharePoint sites can result in copyright and trademark violations – it can also send your marketing team bananas!
In this article we’re going to look at how you can stay on-brand in your SharePoint Sites using Organisation Asset Libraries and something called a Content Delivery Network….
Asset libraries have to be manually created and this article provides a step-by-step ‘how to’ guide.
What are Organisational Asset Libraries and CDNs?
Organisational Asset Libraries provide centralised locations to store approved company images and document templates. This can then be used in SharePoint where designers are adding images and in Microsoft Office when creating documents.
When dealing with files and images that everyone uses enterprise wide, it makes sense to make these as quick and efficient to access as possible.
There are two asset library types, one for storing images and one for storing Office Templates (more on setting up templates in another article).
Asset library contents are ‘published’ using a Content Delivery Network (CDN). A CDN is an industry-wide concept (not just a Microsoft one) where a series of servers spread out in various locations are used to host content like images and videos. The idea being that content is ‘pulled from’ the nearest server, reducing the time it takes to access items.
There are two types of CDN, Public and Private. Normally you would use a Private CDN, to only allow your enterprise users access. Just to confirm, it is a private CDN we will be setting up in this article.
First off – be sure to involve your marketing team and get them to start curating licenced, on-brand imagery, icons and logos.
Once this service is set up they will be able to create folders that align with the different image types they have.
Setting it Up
Check You Have Appropriate Privileges (or Know Someone that Has)
You’ll need to be a SharePoint Administrator and also be your local PC administrator. You’ll also need to allow PNP PowerShell on your tenant which needs Global Administrator rights.
If you don’t have these rights – find a colleague in the IT department that doesand signpost this article!
Create the Asset Library SharePoint Site
The Asset libraries can be stored under a specific SharePoint Online site which is used to host the libraries. This allows other sites to be renamed/moved without affecting the location of the assets. It also helps keep track of access rights.
It can take a while (anything from 1 hour to 24 hours) for the actions to complete, but you can then give your marketing team access to this Assets site and get them uploading imagery, creating folders or adding metadata as required.
Once ready, anyone that’s responsible for maintaining SharePoint content will have access to option to a location called ‘Your Organization‘ from which to obtain corporate images.
Finally, launch this service to all your SharePoint contributors.
Also, make sure your marketing team keeps the repository updated. To this end, it makes sense to set up a handy link to the Assets site from, say, their marketing Team site.
Find out more about our SharePoint Services
We offer a range of services to help you get the most out of your SharePoint Online environment, including storage management, secure access for external users. and design services.
Why your organisation needs a great intranet: #2 Better Communication
One of the most important factors in communicating with a hybrid team is ensuring that information is communicated with everyone, wherever and whenever they are working.
Digital Workplaces for employees to create content, share knowledge, mind map, chat with colleagues and store or retrieve information quickly is key for any organisation looking to enable smarter working and create a digital culture.
Communications channels that work best are the ones that are two way. Not only should news, executive blogs and webinars feature in any solid communications plan but idea management and employee feedback to your executive team is equally important.
This short video features SharePoint intranet guru Sam Dolan and Clare Knight of Essential.
Why your organisation needs a great intranet: #1 Flexibility
A mighty intranet as a gateway to your Digital Workplace, boosts flexibility for your employee’s day to day tasks as well as the environment in which they are working.
It allows employees to connect anywhere, anytime on any device.
Importantly, it delivers the flexibility that’s conducive to achieving home/work life balance especially in today’s society where both worlds can be intertwined.
This short video features SharePoint intranet guru Sam Dolan and Clare Knight of Essential.
Our archive migration service is taking off and we are getting a reputation for being the ‘Pickfords’ Removals’ of the email archive world. Each new project brings its own set […]
Prompted by the press that surrounded the email audit trails at News International, Computing magazine interviewed Essential for its views on the importance of strong email and data governance in […]